-
• #2
break only works within a loop. "do every X seconds" in espruino is not implemented as a loop, but by setInterval(), which runs a callback every X seconds. Quite frankly, I don't think blockly is well equipped to represent this kind of thing - the way it deals with timeout/intervals is not really what you expect looking at it. To stop an interval, you use the interval number and clearInterval.
I think this does more like what you were looking for.
var inter; //used to store the interval number. var lastval; //last thing we set C9 to, so we can alternate. setWatch(function(e) {inter = setInterval(interFun,5000)}; ,C6,{edge:'rising'}) function interFun() { //this could be put into the line above, but this is more readable... if (last==0) {last=1; analogWrite(C9,0.5);} else { last=0; analogWrite(C9,0);} if (last==0) { if(digitalRead(C7)==0 && digitalRead(A8)==0) { clearInterval(inter) //done now - stop the interval from procing again. } -
• #3
Yes, blockly isn't great for that kind of thing - although it would be possible for someone to add a special block that would break out of an
every X secondsblock.For now though, I reckon you've got 2 options to do what you want:
- Keep the
every 5 secondloop going all the time, and use a variable with anif myVariableblock right inside theevery 5 secondloop. You can then stop things or start them by setting or clearing the variable. - Define a function,
fiveSecs, and in that function addif (myCondition) { wait 5 secs { call fiveSecs } }- that's maybe the nicest...
- Keep the
-
• #4
Is there a section in this code that accounts for my OR condition?
-
• #5
I don't quite understand the first option. What would the variable do as far as exiting the loop
And far as the second one, would I make this a recursive function? I'm just making sure that the program can be reset essentially (without literally pressing the reset button).
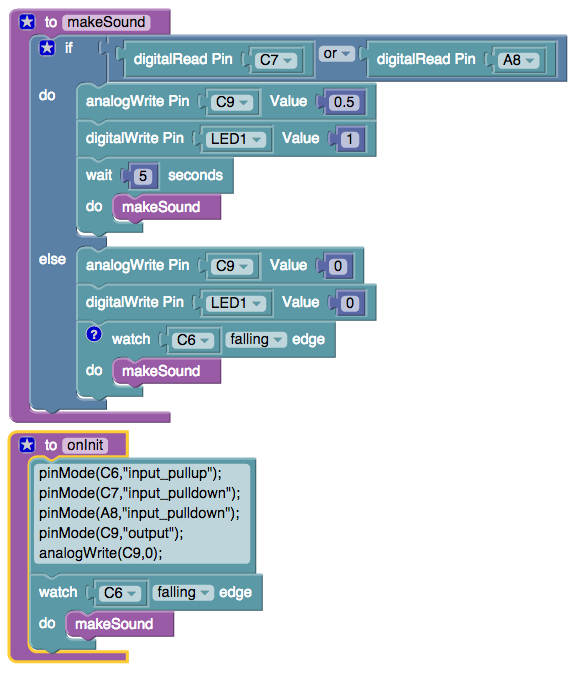
Either way here's what I interpreted from your second option
1 Attachment
-
• #6
#blockly #graphicalprogramming #visualprogramming
First of all, Espruino is event driven, in other words, it does not kill time by nested loops of doing nothing - like the way time is killed in the Arduino code loop - but by setting a timer and linking it to a piece of code that will be run when the timer times out (In Arduino, you can of course use events too - interrupts based on a timing out event of a timer, but it is way more complicated than in Espruino... that's why many of us Espruini - or Espruine, to be politically correct and complete - are so thrilled with Espruino!).
Espruino's main difference to the typical setup of a code loop is that it work only when there is something to do triggered by all sorts of events, such as a timing out timer, a status change of a watched pin, an input available, or some other under the hood created software events. Between the actvities, Espruino can go into very very deep, deep sleepto make a large battery outlive you - litteraly (of course, battery with 'no' self-dicharge).
In your code(s) above, after serting up the timer (javascript: setTimout(...)), it goes to the next statment, which invokes makeSound() rightAway (again)... and you will be able to confirm thia fact when closely lookinf at the description of Espruino-blockly-wait.
The right-away invoking of itself will make Espruino end up with out of memory / stack-overflow, because makeMusic calls itself within itself / while it is still executing. You can fix this issue easily: move the makeSound into the do of wait. This way it does most closely what you described in your first blockly post: check after 5 seconds C7 and C8, and if one is on, get the sound going again and checking again after 5 seconds, and so forth, or switch sound of and wait for the next C6 to fall and get music going.
*I 'despise' this
waitterm,... it even trips me! - A better working wording would be: **time this code block *, similar to setting an egg / kitchen timer to get reminded to check and take the eggs off the fire after set time... Just as you don't let yourself be held up until the timer rings from moving on doing other work, so does Espruino.By now you noticed: there is no loop in the programmatic sense of 'while' or 'for' or 'repeat-until' (even though an interval may look like a loop as in the first blockly post, it is not. It is more like a timing with repetition or continuous timing. And since ou get a handle back on the setup
var intervallTimer = setTimeout(myFunction,intervalTime);, you can use this handle to clear the interval and with that the repetition:clearInterval(intervalTimer);. Btw, same applies for the timout:var timoutTimer = setTimeout(myFunction,timoutTime);, so that when some event else than the timeout makes the timeout obsolete, the timeout can be cleared and prevented from happening:clearTimeout(timoutTimer);.Above blockly code has still an issue afer fixing: while the sound goes on - and the 5 seconds are passing to switch it off and eventually on again, C6 can go low again... and trigger another run of makeSound. Such constructs create nice, upredictable, and difficult to detect application behavior... Therefore, you make the watching a single shot, and after switching the sound off (or not switching it on because neither C7 nor C8 are on), you set the watching again.
The javascript code for that would look like this (otice the debounce AND repeat options which blockly does not support and in Espruino Javascript default to no-debounce and false, respectively, and therefore blockly's default option settings are unknown to me. - @Gordon, do I miss something here?):
pinMode(C6,"input_pullup");
pinMode(C7,"input_pulldown");
pinMode(A8,"input_pulldown");
pinMode(C9,"output");
analogWrite(C9,0);
var makeSound = function() {
  if (digitalRead(C7) || digitalRead(A8) {
    analogWrite(C9,0.5);
    digitalWrite(LED1,1);
  } else {
    analogWrite(C9,0);
    digitalWrite(LED1,0);
    setWatch(C6, makeSound, { edge:falling,  debounce:100 });
  }
};
onInit() {
  setWatch(C6, makeSound, { edge:falling,  debounce:100 });
}
Instead of coding
setWatch();in two places, you could just invokemakeSound();inonInit()instead and it would work too (with a potential issue that sould could go on right away if C7 or A8 are on to begin with, even thoug C6 never did fall...)The blockly code looks like as attached screenshot.
I'm sure you did also some initializing....
Btw, with given code uploaded, you can type
save()in the console (left pane of the Web IDE), which saves your uploaded code in Espruino. Anytime when you re-power your Espruino (Pico), the onInit() runs and Espruino does again what you expect - witout having to upload the code again (In my example, I switch also the LED1 to give a visual feedback).What I miss in blockly too - aside of the watch options - is the ability to set a variable to a function, which then would allow to make the execution sequence very clear: first the initializations, then the (makeSound) function assigned to a variable, and lastly the onInit() with the initial setWatch().
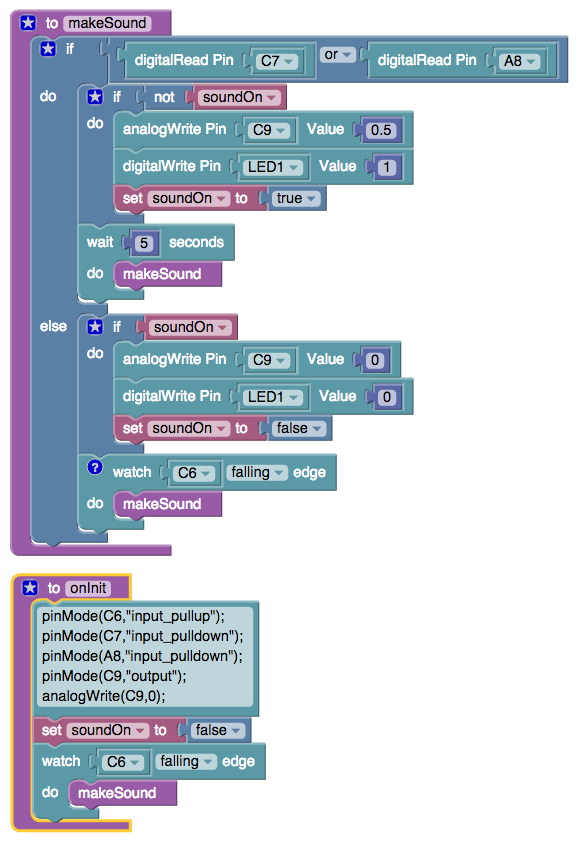
PS: You may hear the re-switching-on as a hick-up. To avoid that, you would keep the on or off state in a global variable and execute the switching on only when not on (yet), and - of course - swtich of only when not switched off (yet). As a human listener, you may not hear nor notice the hickup because Espruino is so fast, but another Espruino potentially 'listening' to your signals will notice. Therefore you want to fully control what is happending. You find the solution in the second blockly attachement.
2 Attachments
-
• #7
I've tried to use the block code you provided but I ended up with an out of memory error.
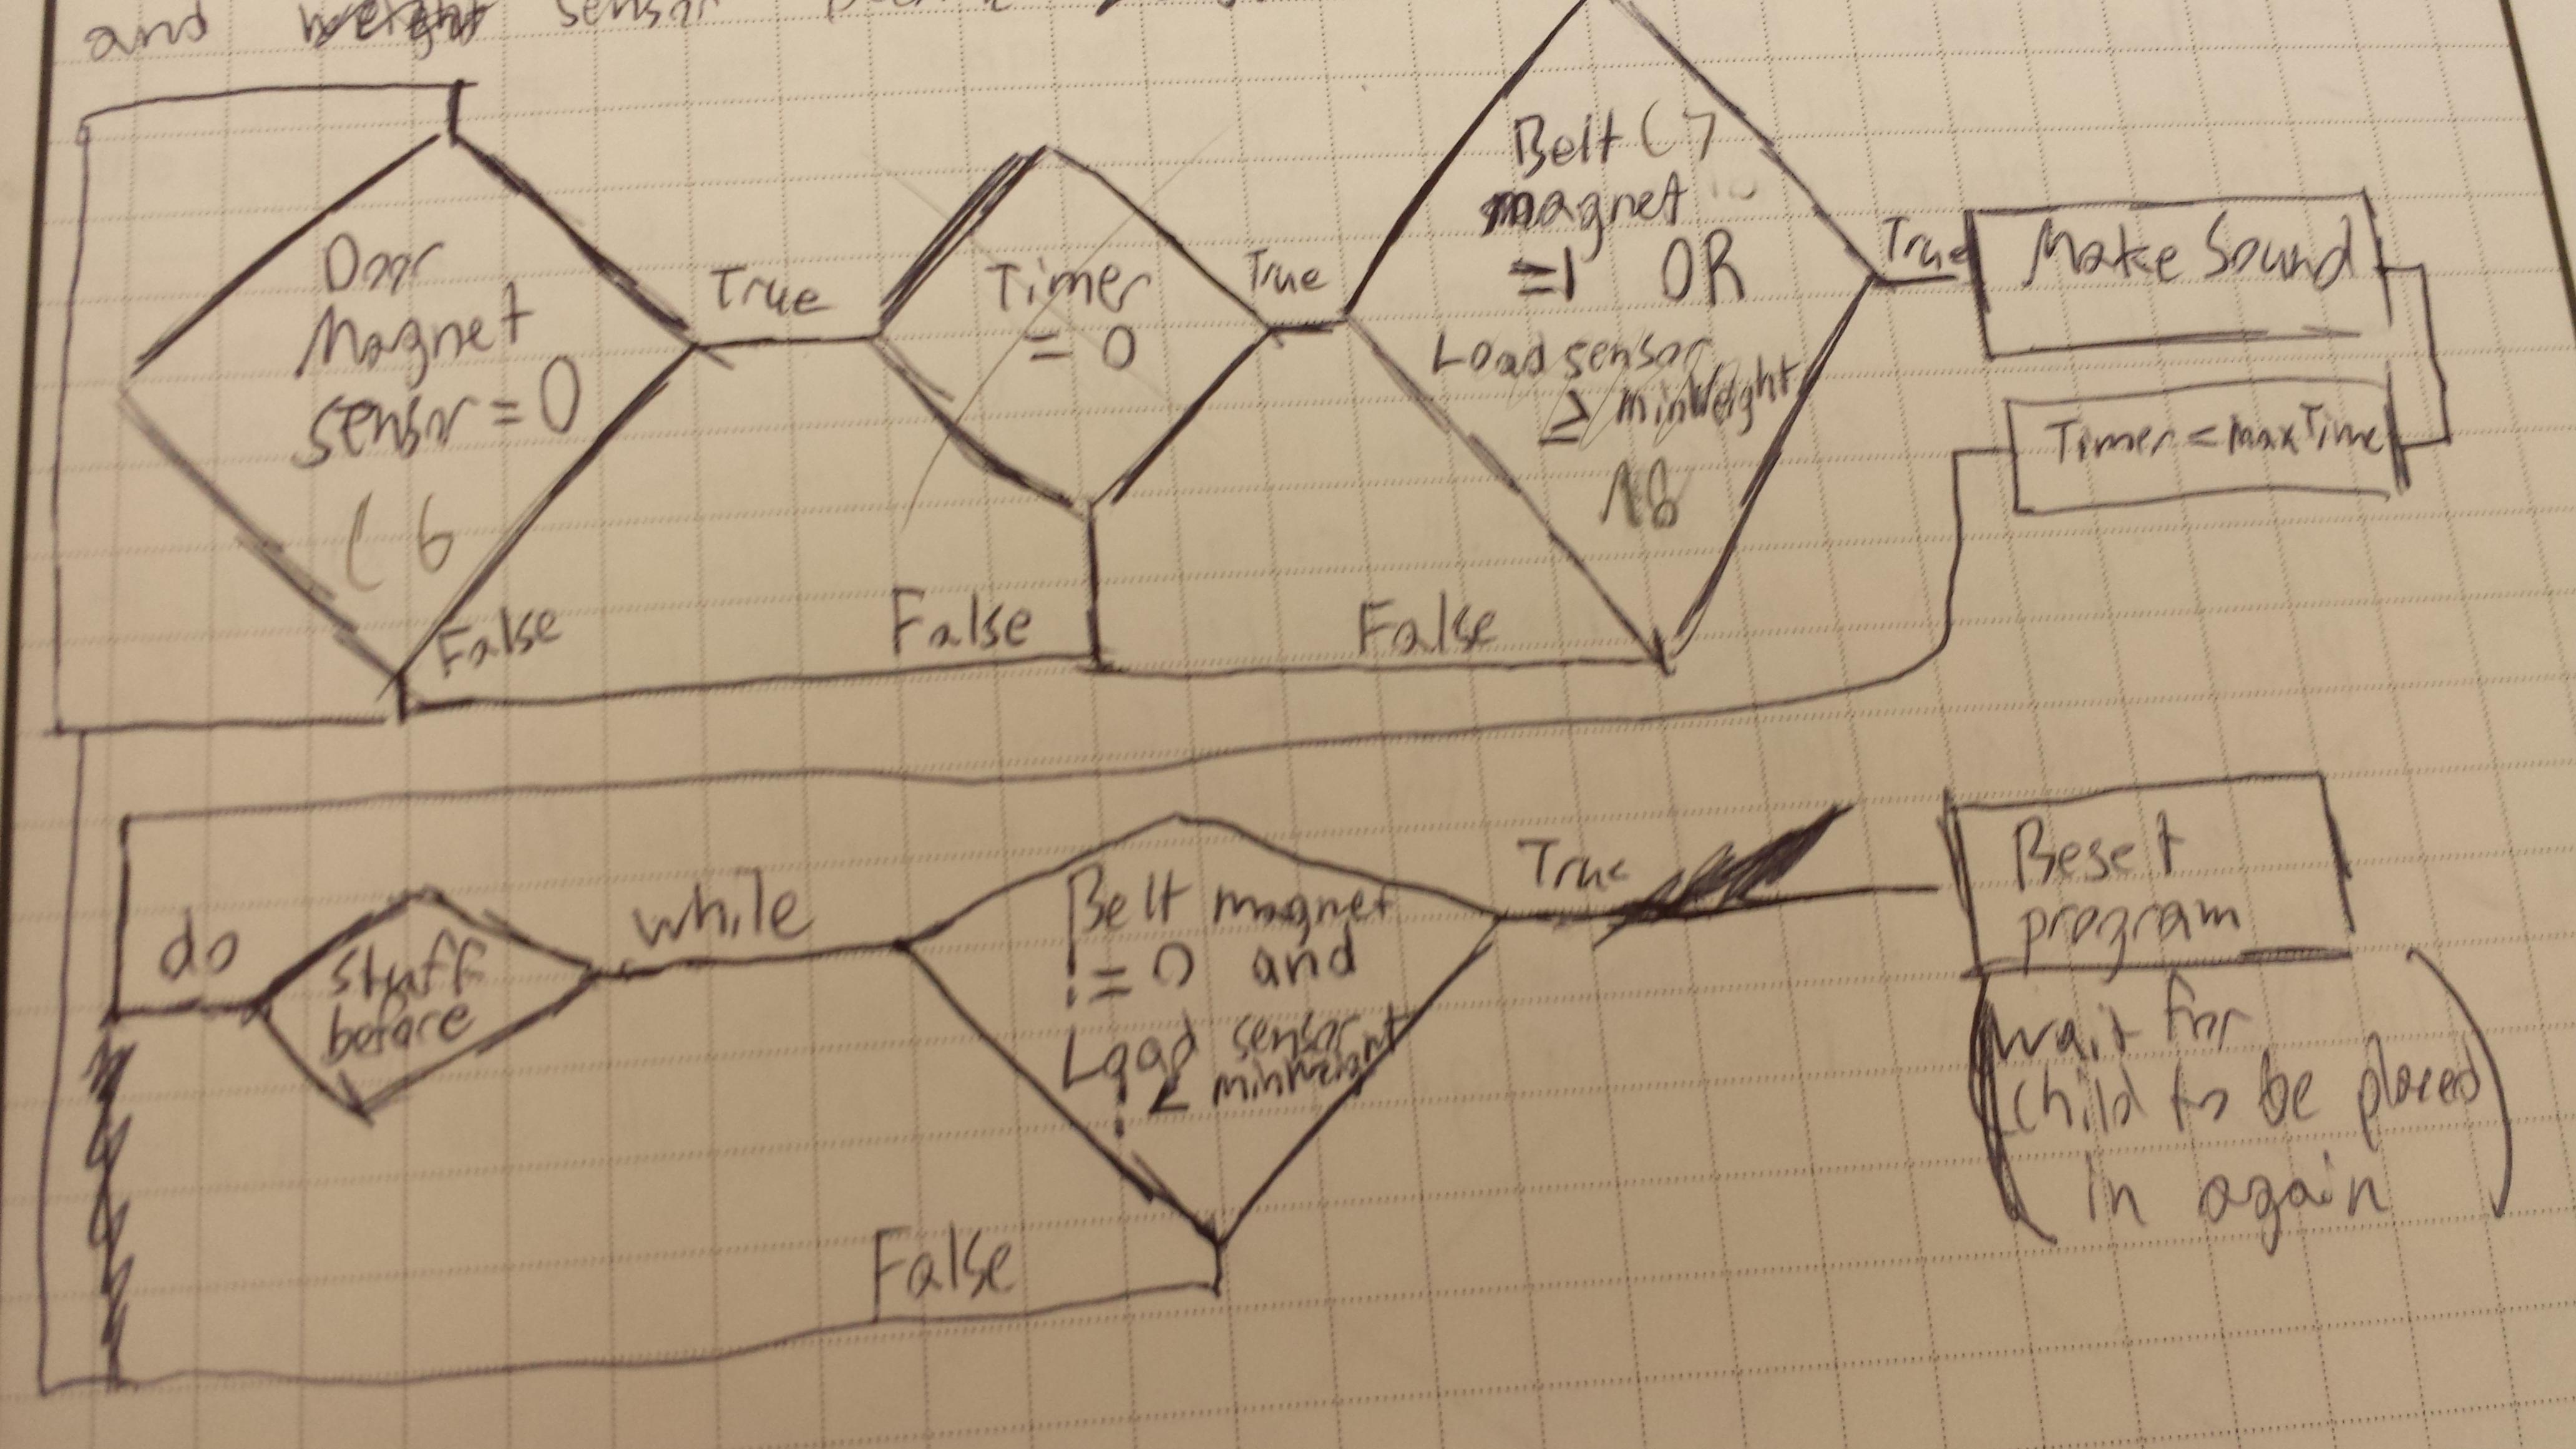
I also have an algorithm I've made.
What I have to do is check for a belt attachment (hall effect sensor on C7) and at the same time have a weight on a scale that is literally connected to the LCD connections (A8) (should send a current out when the weight is above like 7kg). Then when a second hall effect sensor is tripped off (from having a magnet to none) then make a sound to remind someone to remove the belt sensor and the weight and then the sound should stop. Also the sound should alternate 5 seconds on and 5 seconds off.If it would help I can include pictures of my setup.
Would the device work better with the actual Javascript code? I guess I could try.
Thanks for your help so far!
1 Attachment
-
• #8
I had run the blockly like code structure successfully... without going out of memory to turn the LED1 on (instead of sound on C9) and then turning off based on the BTN1 (instead of C6) event and with variables for C7 and A8 that I controlled in the console to emulate your hardware setup. It is quite challenging to replicate larger blockly on visual basis only. Also, at the time of the post, I did not know how I could get the generated / uploaded Javascript code to be shown. Now I know (as you can read in post):
To show blockly generated Javascript code, upload the blockly code to Espruino board, then click into the console pane (left-hand pane), and press the up-arrow button TWICE.
To be precise, it shows only the last uploaded blockly block. If you have more than one blockly block - for example two functions (* to functionName) - press the up button again to show the other block, and so on...
This will show the generated and uploaded code... in a bit ugly format (and not with all semicolons the WebIDE wants it, but nevertheless correct (optimized) javascript). By copying the code shown from the console (just mark the code with the mouse includes an auto-copy on marking-end-event), then pasting it into the javascript source code editor (right hand pane), and doing some editing, you get a nice head start though for moving on with 'real' coding...
Yes, code form source is easier to understand and to build... of course, this is mostly true only for users that did already some (javascript) coding/programming. But you get quickly there and like the code more than the nice looking, instructional blockly presentation (btw, I'm not aware of any function in the WebIDE that would create blockly out of source code).
Would the device work better with the actual Javascript code?
No, not really, because it is javascript after all that is uploaded... Espruiono has not knowledge whether the code came to be by direct coding or by generating from blockly. Too bad that I did not save the blockly code or I just cannot find it quickly and look at the geneated code... but I will see what I can do to find the issue you are running into. Using coding with the same logic, you should though just be fine.
Thanks for sharing what you actually are doing. I may understand a bit better what you want to achieve.
-
• #9
Hi, found some intermediate version of the blockly code and looked at it: in deed, it goes out of memory - for me after a while only - for multiple reasons (confirmed by the inserted console.log() statements to figure out what's going on):
- default for repeat-option in blockly is set to true - my code expects to have it false (set to true, it adds another watch everytime it runs through the else path, calls itself, and cascades, and... in goes 'Out of memory' with a bouncy hand contact... (used C6 and a bread board wire to touch ground).
- any setWatch() should have the debounce option set to catch jitters.... (...just a the mother ;-) of the china store...).
With grabing what blockly uploads, then fixing it, gives the code that shold work perfectly for you (if not, just come back and give me the red card... :|):
/* Blockly uploaded code var soundOn;function onInit(){eval('pinMode(C6,"input_pullup");\npinMode(C7,"input_pulldown");\npinMode(A8,"input_pulldown");\npinMode(C9,"output");\nanalogWrite(C9,0);');soundOn=false;setWatch(function(){makeSound()},C6,{"repeat":true,"edge":"falling"})} function makeSound(){if(digitalRead(C7)||digitalRead(A8)){if(!soundOn){analogWrite(C9,.5);digitalWrite(LED1,1);soundOn=true}setTimeout(function(){makeSound()},5*1E3)}else{if(soundOn){analogWrite(C9,0);digitalWrite(LED1,0);soundOn=false}setWatch(function(){makeSound()},C6,{"repeat":true,"edge":"falling"})}}; Shows these issues on first C6 going low: ERROR: Out of Memory! WARNING: Out of memory while appending to array WARNING: Unable to create string as not enough memory at line 1 col 285 ...eat":true,"edge":"falling"})}} ^ in function "makeSound" called from line 1 col 12 {makeSound()} ^ in function called from system at line 1 col in function called from system at li> */ // *fixed* code - with some formatting to shorten lines var soundOn; function onInit() { eval( // broken up in concat'd strings for short lines 'pinMode(C6,"input_pullup");\n' + 'pinMode(C7,"input_pulldown");\n' + 'pinMode(A8,"input_pulldown");\n' + 'pinMode(C9,"output");\n' + 'analogWrite(C9,0);' ); soundOn = false; setWatch(function(){ makeSound(); // 'fixed': added semicolon ; },C6,{repeat:false,edge:"falling",debounce:100}); // 'fixed': added ; and ... // ...SET repeat OPTION TO false } function makeSound() { if (digitalRead(C7) || digitalRead(A8)) { console.log("then - " + getTime()); if (!soundOn) { analogWrite(C9,0.5); // 'fixed' warn'g: added leading 0 digitalWrite(LED1,1); soundOn = true; // 'fixed': added ; } setTimeout(function(){ makeSound(); // 'fixed': added ; },5*1E3); // 'fixed': added ; } else { console.log("else - " + getTime()); if (soundOn) { analogWrite(C9,0); digitalWrite(LED1,0); soundOn = false; // 'fixed': added ; } setWatch(function(){ makeSound(); // 'fixed': added ; },C6,{repeat:false,edge:"falling",debounce:100}); // 'fixed': added ; and... // ...SET repeat OPTION TO false } } // 'fixed' warning: removed unnecessary semicolon ;Btw, this eval("javascript source code string") is a very very bad thing... may be blockly has to do it (not really... since for espruinio passing just the source string would work too... (@Gordon?)), you can do it directly with:
function onInit() { pinMode(C6,"input_pullup"); pinMode(C7,"input_pulldown"); pinMode(A8,"input_pulldown"); pinMode(C9,"output");\n' analogWrite(C9,0);' soundOn = false; setWatch(function(){ makeSound(); // 'fixed': added semicolon ; },C6,{repeat:false,edge:"falling",debounce:100}); // 'fixed': added ; }Furthermore, you can take the *pinMode()*s out of the onInit() and put it together with the declaration of the soundOn variable, because saving the code makes Espruino holding on to the pin configuration - is that right, @Gordon?
var soundOn; pinMode(C6,"input_pullup"); pinMode(C7,"input_pulldown"); pinMode(A8,"input_pulldown"); pinMode(C9,"output"); function onInit() { analogWrite(C9,0); soundOn = false; setWatch(function(){ makeSound(); // 'fixed': added semicolon ; },C6,{repeat:false,edge:"falling",debounce:100}); } - default for repeat-option in blockly is set to true - my code expects to have it false (set to true, it adds another watch everytime it runs through the else path, calls itself, and cascades, and... in goes 'Out of memory' with a bouncy hand contact... (used C6 and a bread board wire to touch ground).
-
• #10
Your final code looks then like:
var soundOn; pinMode(C6,"input_pullup"); pinMode(C7,"input_pulldown"); pinMode(A8,"input_pulldown"); pinMode(C9,"output"); function onInit() { analogWrite(C9,0); soundOn = false; setWatch(function(){ makeSound(); // 'fixed': added semicolon ; },C6,{repeat:false,edge:"falling",debounce:100}); } function makeSound() { if (digitalRead(C7) || digitalRead(A8)) { console.log("then - " + getTime()); if (!soundOn) { analogWrite(C9,0.5); // 'fixed' warn'g: added leading 0 digitalWrite(LED1,1); soundOn = true; // 'fixed': added ; } setTimeout(function(){ makeSound(); // 'fixed': added ; },5*1E3); // 'fixed': added ; } else { console.log("else - " + getTime()); if (soundOn) { analogWrite(C9,0); digitalWrite(LED1,0); soundOn = false; // 'fixed': added ; } setWatch(function(){ makeSound(); // 'fixed': added ; },C6,{repeat:false,edge:"falling",debounce:100}); // 'fixed': added ; } } // 'fixed' warning: removed unnecessary semicolon ; onInit(); // starts code immediately after upload - useful at development timeWhen you develop/test (without the last line), you upload the code and invoke the
onInit()function in the console with a command, or, you can just add as last line ('onInit()') in the code and you have it quicker going. I would though not have the last line in the version of teh code hat you save to the board, because running code may have started timers which may mess up 'your life'...So much for the code correctness... ;-).
To use Espruino through blockly, blockly needs some more work to cover all Espruino specifics.
Now for your actual case, I have to mentally picture it first, before elaborating on possible code changes.
-
• #11
Since C6 is an event (falling) and not a state, it cannot be a decision-item ('if') of your flow diagram... it is the trigger of getting that flow going... (your 'flow-loop'-pattern may come from the typical implementation in an Arduino execution loop). Because you mention a Door, the door does something to trigger your sensor to create a falling signal. Is the event - A) 'door just closed', or - B) 'door just opened'? You also have a crossed-out timer. What was the original purpose of it?
Since only a door event makes something happen, I'm not clear what is going on. A more detailed description - and even a picture of your setup could help.
-
• #12
Sorry, in too much of a rush to check everything, but:
Btw, this eval("javascript source code string") is a very very bad thing...
It's actually not that bad to do in Espruino, but in this case it is pointless. I think there was a reason I did it that way in the graphical editor - but I can't remember it now.
It's not a big deal, because realistically you're never going to fill up available RAM with a blockly program and speed isn't really a priority either...
you can take the pinMode()*s out of the *onInit() and put it together with the declaration of the soundOn variable, because saving the code makes Espruino holding on to the pin configuration
Yes, that's true. It tidies the code up a little :)
-
• #13
Sorry for the late response, I must have missed the email notification.
New updates:
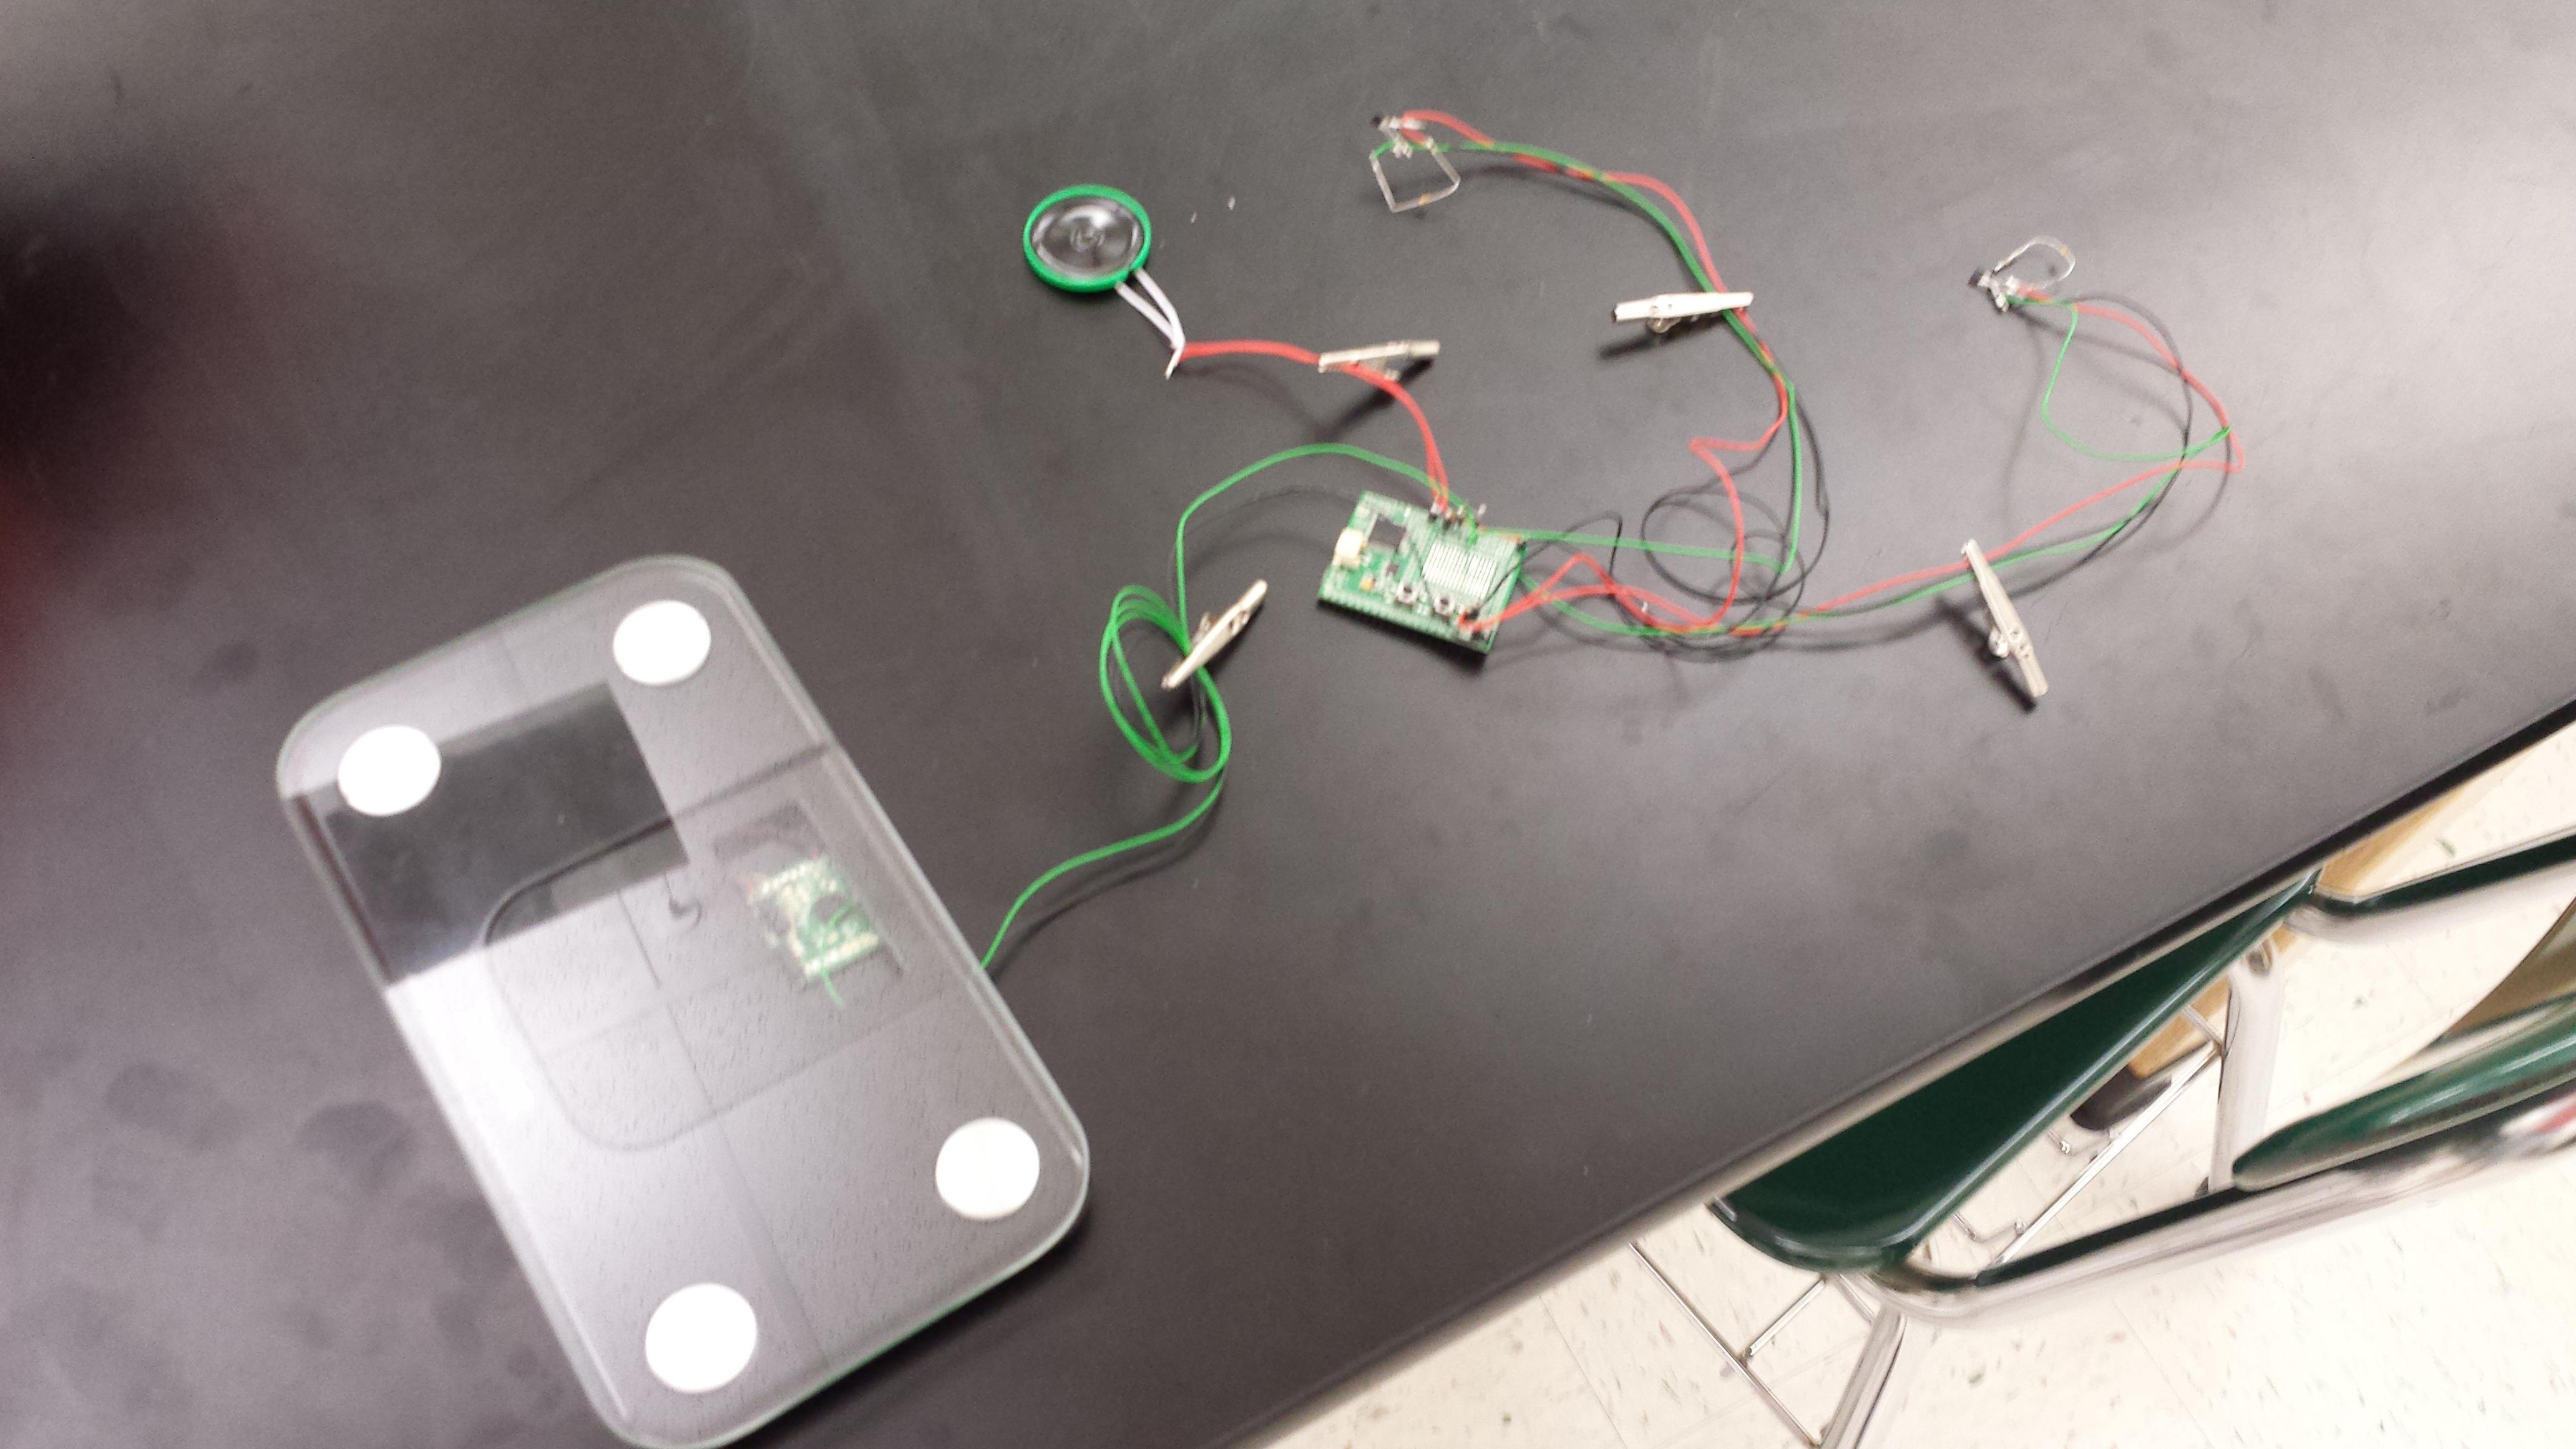
I have no idea whether the weight sensor (scale LCD hack setup) can be used because the value always switches from 1 to 0 at random without any weight put on the scale
Switched the scale output to C4 or C5 to implement the ADC to see if I'd get a different value (the value still just goes from like 0.864 to .5something to .28something to 0 at random)
The Hall Effect sensors I have are the kind that switch on, meaning (so far as I understand) they have to place the one pole near it to activate it, remove that pole, and then place it near again to deactivate it.Is the event - A) 'door just closed', or - B) 'door just opened'?
The one HES (Hall Effect Sensor) is on a door that is (what I wanted it to do) just opened. The code with it though needs to reflect the switch aspect of the HES. Did I also mention that this HES is the sensor on C6?
You also have a crossed-out timer. What was the original purpose of it?
The original purpose of the timer was to have the program check if the scale and belt HES were both on and then sound the speaker for a certain amount of time until the scale and belt HES went off no matter the reading of the door HES and then somehow be able to repeat this (scale would output and then belt HES would activate and then wait for door to open). Also with that little note, I realized that someone would have to open the door after those two activated, and I need it to go off only after the person is getting out of the car (so opening the door after setting up the sensors but ignoring that door opening until the person gets out) . Anyways, the timer now would just be used for timing the time the speaker is on and then off.
I will upload the picture in another post as well as a better description.
Hopefully that helps answer some things. Thanks!
-
• #14
Door, belt, scale... I was in plant/warehouse processing... With car and person, I get the proper belt and scale context: safety belt of a car and scale is a weight sensor in the car seat.
With hat, I guess, you want to make a device that reminds you to buckle up and save yourself a ticket... as the immediat actions... and have a longer life when looking at the grander scale... ;-)
Cklick-it - or Tick-et...
-
• #15
Are you planning to put the hall sensor into the buckle to detect if the 'plug' part is in?
With the ability go to (almost) any length in your code, you can even detect - to some degree - cheaters: Defining a sequence of events on a state machine lets you detect any odd behavior and sound alarm...
-
• #16
Okay the top HES is the door HES and is C6. The right HES is C7 and is for the belt.
The scenario is for my senior engineering class. My partner and I decided to try to prevent child (aged 1-4) heatstroke deaths. We came up with a setup that has an HES on the door and one on the belt of a car seat. The scale would be on the place where the child would sit. The scale (how we would have it) would output the weight of the child to the board so we could use it, but we couldn't find a way to integrate it that way do we opted for a signal that would come from the scale Lcd when the weight was above the minimum value(the scale shown turns on the lcd above a minimum weight). That wasn't the case. The child would be placed in the safety seat which would add weight to the scale and then the belt would be buckled together which would activate the belt HES. When the driver opens the speaker should sound for five seconds and be org for five seconds until the belt is unbuckled and the child removed from the safety seat. Closing that door should not turn off the speaker.
2 Attachments
-
• #17
Are you planning to put the hall sensor into the buckle to detect if the 'plug' part is in?
Yes that was the plan but it won't quite work like that because of the switch function of the HES.
-
• #18
That is way cool!
I would start just with the door HES and the scale.
To get the belt sensed may turn out difficult, and a changing of the buckle is a legal/insurance thing (may be the buckle has already something for such a sensing but it is not populated...). For sensing that the belt is unbuckled, you could just take a small box where the belt tab has to be placed/parked. An if it is not parked, it considers it buckled.
Next thing is the scale: did you check if the scale stays put? Most scales have a timeout... in other words, you may need to switch the scale on and off with Espruino to make sure it is on. The issue then with most scales is, that they try to find their 0 (zero), and if the weight is not stable, it goes to error. if you can find a capacitive sensor, that could help. Said that, you may just use a device where the child seat belt tab has to be parked in order to consider a child in or out, and then deal with the door. In todays cars with airbags, the driver and the front passenger seat have already an even weight distinguishing senser. Check out what these sensors are and you may go the same route for that. You put such a sensor into the child seat (under the lining, between the fabric (with padding) - which you usualy can take of for washing).
Other options are sensing weather the key is in the ignition (and partially turned...) just came switched on of just switchet off, etc... that's easy: most cars have a outlet (cigaret lighter) socket that disconnect from 12 V power as soon as the key is taken out (to prevent the battery going down). Plugging your device into that gives you the signal right away: when power switches from external 12 volt to your device powering battery... Using that 12 socket is at the same time a charging source... ;-) - you get me going here...
-
• #19
I'm not quite sure what you're planning with the scale, but it looks to me like you only connected one wire... You'd need to connect ground up between Espruino and the scale as well.
Also, maybe the signal out of it is actually PWM? I have no idea what you've connected to, but maybe you should try and use an oscilloscope to see what the value out of it is actually doing?
-
• #22
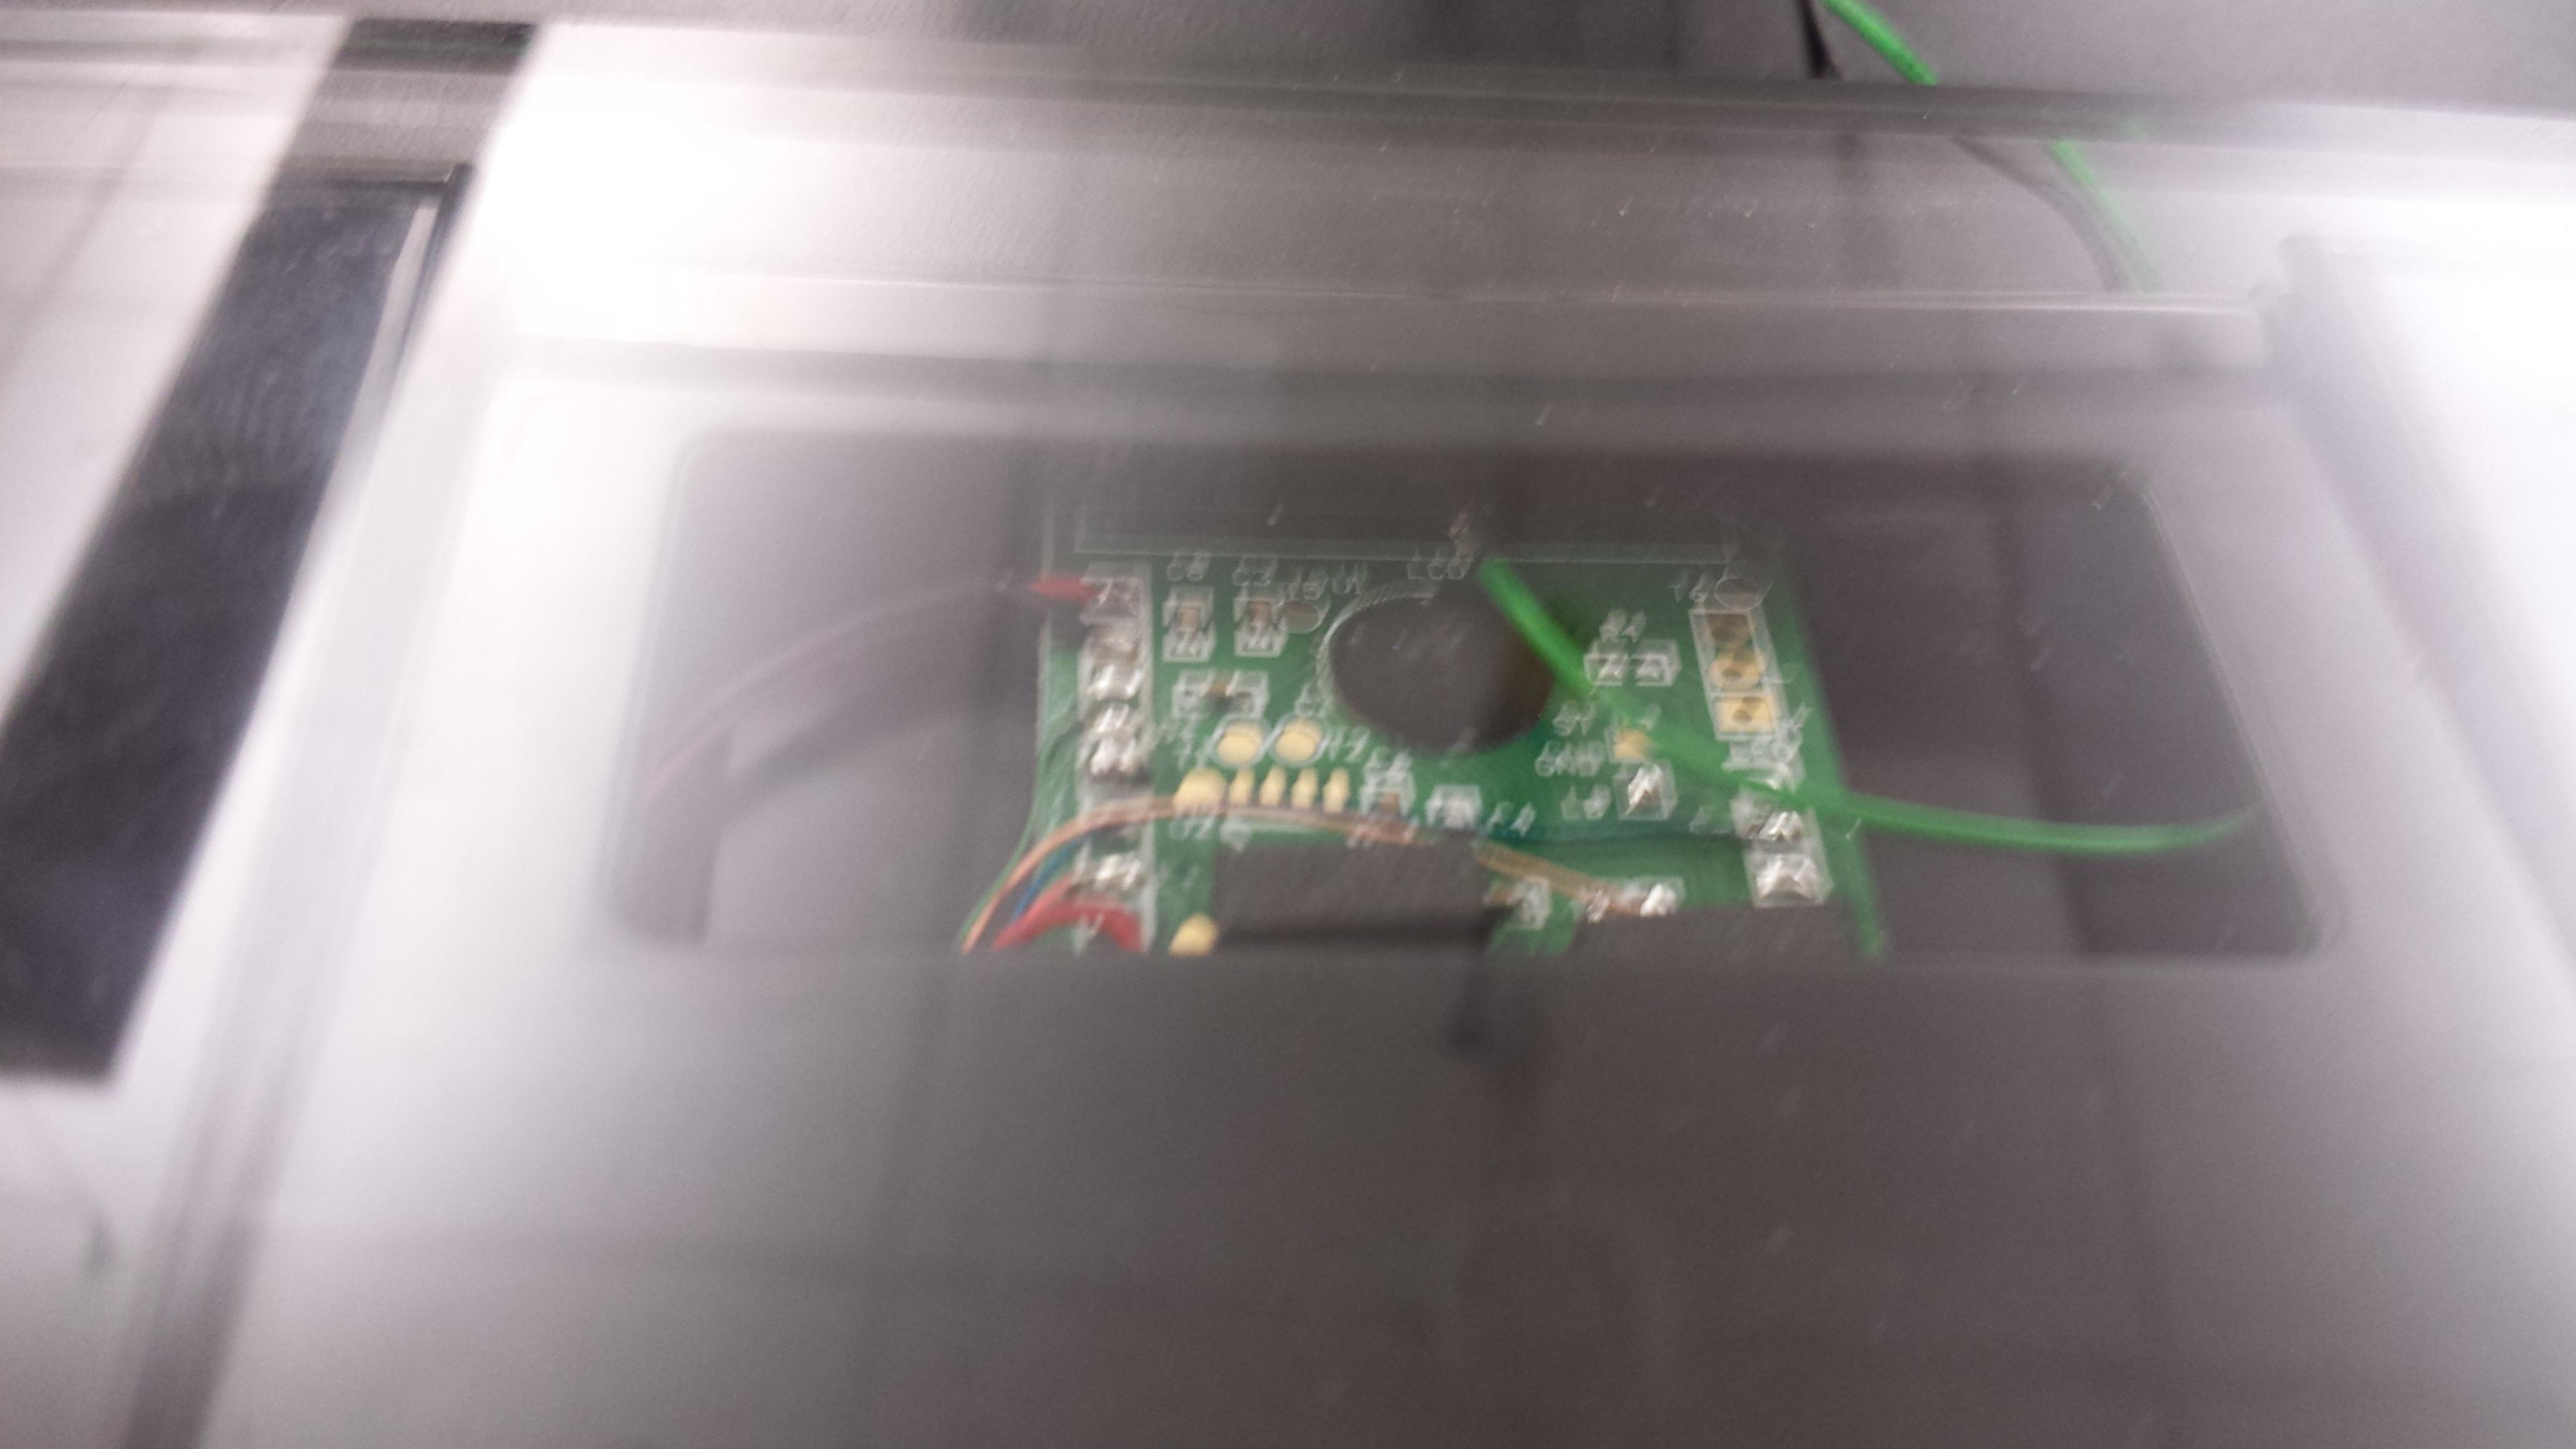
@Gordon I tried to use a scope but I didn't really find anything. I also didn't know what to have my physics teacher do with the scope. I did find however that there is a constant wave going through that specific LCD pin/plate(I don't know what to call them at this point) which would account for the non-zero value. I also don't know what kind of LCD I have in the scale, since that might shed some light on what kind of input that kind needs.
I have 10K ohm resistors but no capacitors unfortunately. -
• #23
Such (scale LCD) displays are multiplexed. In other words, when you look at one 'pin' of the LCD, you see a on-off-on-off-... signal. Multiplexing is a technique to reduce the number of connections. I would be surprised when these cheapo things - chip under the black blob - would provide connectivity to an information/externalize a signal that would tell you something about the weight on the scale. Most of these boards have test pads. I would start of with a simple multi-meter and see if one of the golden, shiny pads provide you with a signal that you can use.
-
• #24
a constant wave
So it's not stable at one voltage?
If that particular pin of the LCD display does what you want, I'd just use that. When that part of the LCD shouldn't be lit, do you end up with nothing on the signal line? Or is it always the same waveform displayed regardless of the weight on the scale?
 DrAzzy
 Gordon
 Progma
 allObjects
I need to end a "repeat every __ seconds" loop, but I only want it to end after a certain condition is met. I think that just putting the "break out of loop" control function would work but it is warning me that it needs to be placed in a loop, which it technically would be. I'll place an image to show what I mean just in case.
1 Attachment