-
• #2
I see two pots on that board - it's not clear exactly what they do from their half-sentence descriptions of them though.
I suspect that one of them adjusts the trip point of Dout (ie, if reading is below a specified value Dout is low else it's high, or something like that)
Espruino doesn't have "float" declaration - js doesn't make you declare types.
Espruino's analogRead() returns a floating point number between 0 and 1 (not a number from 0 to 1023 like Arduino).
For Espruino, the equivilent of that line would be:
var co2=analogRead(pin);
var ppm=400+co2*(10000-400)But - you say it's inverted. No problem:
var co2=1-analogRead(pin);
var ppm=400+co2*(10000-400)I do not by any means expect that calculation (nor the Arduino one) to yield a vaguely accurate number for ppm though, because that line (the one you posted and I converted to Espruino) assumes that 10000 ppm and 400ppm are at the far ends of the scale, which is probably not the case.
-
• #3
Tnx DrAzzy, it looks like Dout is like you said, some kind of alarm pin (HIGH/LOW), Aout giving value from 0-2volts (that is from the auction description) but I measured that when I power it by 6V high efficient power supply then have something like 1.07volt at the beginning and when I blew on the sensor got minimum of 0.73volt (however it depends what level of gain you use, there is small potentiometer - but it's not changing it from 0 to 2 volts as I seen)
so, 0.73-1.07volt in my case should be 'map' to 400-10000ppm -
• #4
That's an interesting sensor - albeit a bit pricey. If you don't mind my asking what's your project. I imagine this would be a good way to monitor a fermentation process?
-
• #5
no problem, I want to use it to monitor CO2 retention during diving
-
• #6
when I checked the voltage espruino return now I've got 0.88volt when start and sensor is warmed, and 0.72volt when I blow on it
var co2 = analogRead(A5)*3.3;when used this code
var co2=1-analogRead(pin); var ppm=400+co2*(10000-400)I've got readings at about 7400ppm, I fixed it but just for 400ppm level
var co2 = 1 - analogRead(A5);
 var ppm = 400 + co2*(10000-400);
  console.log(co2);
  console.log(ppm*0.054163846);
can't get readings of about 10000ppm when voltage on the sensor is 0.72volt
-
• #7
if found this for map function in arudino
long map(long x, long in_min, long in_max, long out_min, long out_max)
{
  return (x - in_min) * (out_max - out_min) / (in_max - in_min) + out_min;
}
anyone could change it into espruino?
-
• #8
I think just remove the 'long's, and put the open brace I same line as the function definition. And start it with "function" like any other js function
-
• #9
did it already, forgot to post it, it works ;) tnx
-
• #10
hi, haven't use yet Espruino timers, would like to make some command on the beginning for 5minutes and then read and print values from MG-811 sensor,
I want print "wait" on the console or display and when 5minutes times from the start will finish I want to Espruino start read the values from sensor and print these values instead of wait word
could someone help me with this? -
• #11
...what about:
function measureAndLog() { var value; // your measuring and calculation assigning result to value console.log("CO2 measured: " + value + " [ppm]"); }; function cycle(){ console.log("waiting..."); setTimeout(function(){ measureAndLog(); cycle(); },300000); // 300'000[ms] = 5 [min] } cycle(); -
• #12
thank you will check that later on,
have another problem with this sensor,
when I connect it into multimeter it shows quite stable measurements,
when I blow on the sensor volts value is changing quite fluent,
but when I use espruino with analogRead function for this, and convert it into volts,
then my measurements are not stable, and are changing more than a little,
is any way to stabilize it? -
• #13
Your best bet is to take many measurements, and to then take the average of those. For instance:
var sum = 0;
var n = 100;
for (var i=0;i<n;i++) sum+=analogRead(INPUT_PIN);
var result = sum/n;
There are other ways you can do this as well, for instance you can median filter:
var arr = new Uint8Array(100); for (var i=0;i<arr.length;i++) arr[i]=analogRead(INPUT_PIN); arr.sort(); result = arr[arr.length/2]; -
• #14
median filter looks better for my purposes, I’ll check that today, thanks Gordon
-
• #15
median filter from the code above Gordon is returning 0 value, could you fix it?
average way isn't correct after while, on the beginning values are corresponding to multimeter but after few minutes average isn't change as fast an as accurate as value on the multimeteraverage filter could be quite good if it could reset every some cycle of time and take fresh reading values for count
allObjects: your code is working but after setTimeout time I see both "waiting" and "CO2 measured..." commands - would like to leave only readings after 5min
-
• #16
var arr = new Uint16Array(100); for (var i=0;i<arr.length;i++) arr[i]=analogRead(INPUT_PIN)*65536; arr.sort(); result = arr[arr.length/2]/65536; -
• #17
code is working but after setTimeout time I see both "waiting" and "CO2 measured..." commands - would like to leave only readings after 5min
That's the way the console works... and it makes sense, becuase console is a shared resource,... and each log should be 'atomic' - a transaction. You can use
print()andprintln(). The challenge then becomes to prevent something creating output while you are waiting for the measurement and messing it up.Therefore, in an event driven environment and a (single) log, you want to be each log entry / output to be as complete / comprehensive as possible. To make it more clear, I usually do it this way:
var co2Value = 0; // globally defined for pickup by Espruino testing feature

function co2MeasureAndLog() {
  // your measuring and calculation assigning result to co2Value
  console.log("CO2: measured: " + co2Value + " [ppm]");
};
function co2Cycle(){
  console.log("CO2: waiting...");
  setTimeout(function(){
    console.log("CO2: waiting... Done.");
    co2MeasureAndLog();
    co2Cycle();
  },300000); // 300'000[ms] = 5 [min]
}
cycle();
It creates one more line of output, but is it is very clear what is going on.
I'm sure hat you may have different display arrangement for your final project where there is a spot reserved for every value to display... as well as an indicator (whether the particular) measuring loop is active. With dedicated spots for each measured value there is no issue. Furthermore with this kind of information it is useful to also put the time (stamp) with the measured result to give feedback about the actuality of the value.
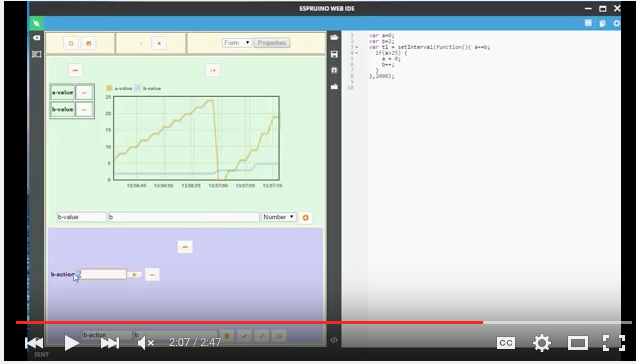
I suggest that you look at Espruinos Testing feature built by @JumJum - it will show you the values in a nice graph. Even though the feature it is still declared as Beta, it is fulluy functional... and there is a sequence of youtube videos
that shows how to use it. In a nutshell:- Write your program just as you did (but) with your result(s) globally accessible (see above)
- Run your program
- Switch from console to testing (click
</>icon at bottom in left border of console) - Add the global variable name
co2Valueto the list of values graphed - Run your testing
By default, testing samples / pulls the values every second. To change that, go into the settings and pick the interval suitable for your application. When everything is setup the way you want, you can save the testing with and later reload and run again. There are even more nice opitons that allow you to load the program with the testing.
1 Attachment
- Write your program just as you did (but) with your result(s) globally accessible (see above)
-
• #18
Gordon, I'll checked that, values are still floating :(
maybe is possible to use average example code you wrote, and set something like permanent refresh of function which will count analog Value again and again from the start?
average function was very accurate on the beginning but not after a while, maybe is should reset old value and start with new one every let say 1000 ms? -
• #19
I'm not sure I understand. 'Still floating'?
So the median filter code works, but the value is still not reliable? If so, you may need to median filter over a longer time period - perhaps including samples that you have previously taken.
-
• #20
yes, value are not reliable, maybe I better connect it into ADS1115 and get Co2 value by that amp?
as have no idea how to set it for proper analog readings, multimeter is stable with readings, espruino not -
• #21
Hey just trying to figure out how to code my Arduino senor MG811. wondering if you can share the Arduino code you're trying to configure. In that way, I can test my sensor. Surely it helps a lot.
 DrAzzy
 bigplik
 Ollie
Ollie allObjects
 Gordon
 user131985
Hi, anyone could help to run measurements from this sensor run on Espruino?
there is only few arduino codes I found, but they are made for different module I have,
pinout are not the same.
My module is one of this http://www.aliexpress.com/store/product/1PCS-X-New-CO2-sensor-module-MG811-module-free-shipping/437150_1374147854.html
Found somewhere in the web that it is equipped into op amp to.
There is 5 pins: Vcc,Aout,Dout,GND and Tcm.
I think Aout is analog output, Dout digitalone? and not sure about Tcm,
there is two potentiometers for TTL signal adjustments and signal amplification.
Module needs 6V for heating and after while should give correct readings.
I get some value on analogRead but first they are inverted, so when blow into the sensor reading decrease and when stop readings rise to the start level. So can't map it like in arduino style way eg.
and get readings like when blow ppm rise, when stop ppm drop
sensor measure CO2 concentration from 400ppm to 10000ppm - like datasheet said
in this range it will change voltage output at very small range (30mV)
would like to run it on Espruiono, if anyone could help I can provide links about this module I found till this time