-
• #2
The easy way to start and to get a feeling for the Espruino programming and implementation model is to take an Espruino board - such as the PICO - and write a module in JavaScript talking to the API of the DWM1001C module. You incrementally add API function by function and wrap it in a method / function the way it best serves a JavaScript usage context. This will not only get you very familiar w/ (constraints of) Espruino but also with the constraints of the DWM1001C module.
DWM1001C module was developed w/ a very specific purpose in mind and it shows it's full potential using Decawave's firmware. Afaiu, Decawave's firmware takes care of all the intrinsics that go with handling the accelerometer and UWB communication... in addition to what has to go on for BLE. The firmware runs on the nordic nrf52 chip. Even though the nrf52 chip is quite powerful, I'm not sure if - first - it has enough dynamic resources left - cycles - that can handle another two main tasks that are usually going on in an Espruino context - and second - has enough static resources left - memory, timers, etc. - that Espruino requires. And if it has, you have to wonder how much is then left for the actual application on the chip.
You may know that Espruino is also available on other boards that are mainly for communication - Wifi in this case - such as https://espressif.com 's ESP8266... a very popular and very affordable thing. The challenge there is that unique to communication timing matters a lot and therefore anything with communication has highest priority... and not much is left for anything else - last but not least, it is just a single processor / cpu / core. You find countless examples where things are tried in such frugal context but hit a wall when it is just too much to fit in to the 'window' left open for other things, such as the Espruino eco-system and the application. Not for nothing did https://espressif.com come up with the ESP32: it has two cores and lots more of memory and os-like firmware to become a platform for applications than rather 'just' a 'communication' module with some additional useful application components and firm/software.
Even if you achieve Espruino eco system to run on Decawave's DWM1001C module, the application has also to 'dance around' the underlaying constraints. That would be the same when you would have to care about the specifics outside of the Browser in your Web app - exactly the opposite what is pursued with JavaScript in a browser: independence of the layers underneath. This independence has it's price... and that's static and dynamic resources.
Last but not least you have to consider how licensing is involved. As much as open components are used as you can read at https://www.decawave.com/dwm1001-dw10001-dev-and-mdek1001-documents-source-code-android-application-firmware-image/ , there is a binary, not open licensed components and the requirement of always to be tied to Decawave devices / hardware.
The conversation's title is
...creating support for A Module
which tells me to write a (node js like) JavaScript / software module to interface Decawave's DWM1001C module from an Espruino eco system. The module then becomes part of https://espruiono.con/modules library to expose DWM1001C module's function thru an API in JavaScript - like a language binding.
-
• #3
Thanks thats exactly what I needed to know but I am unsure where to start. I'm extremely new to this and I am unsure what you mean by hooking in a PICO to the Decaware module. I have two pucks and my knowledge of connected chips to others is limited (if i am using the correct phrases)
-
• #4
Tue 2019.10.29
Until @allObjects is able to respond, some links to peruse to assist in that insight:
'unsure what you mean by hooking in a PICO to the Decaware module'
Although I'll defer to his response, I believe the intent would be to create code on a working Espruino device, then start/build communications to the other development board before actually tackling the task of getting it all working on that board.
The Puck is a bit limited on I/O but might be suitable depending on the envisioned working project requirements. See the fifty or so tutorials there.
IMO easiest device to get started with - just plug into USB port and go: (see heading Pinout)
Sample instructions connecting a device: (basic accelerometer)
Tutorials - loads to observe:
'knowledge of connected chips to others is limited'
Communication UART - UART
A bit advanced at this point, but a track you might be on
'but I am unsure where to start'
Quick 4 minute overview
-
• #5
to get started take a look at the API programming guide at https://www.decawave.com/dwm1001/api/
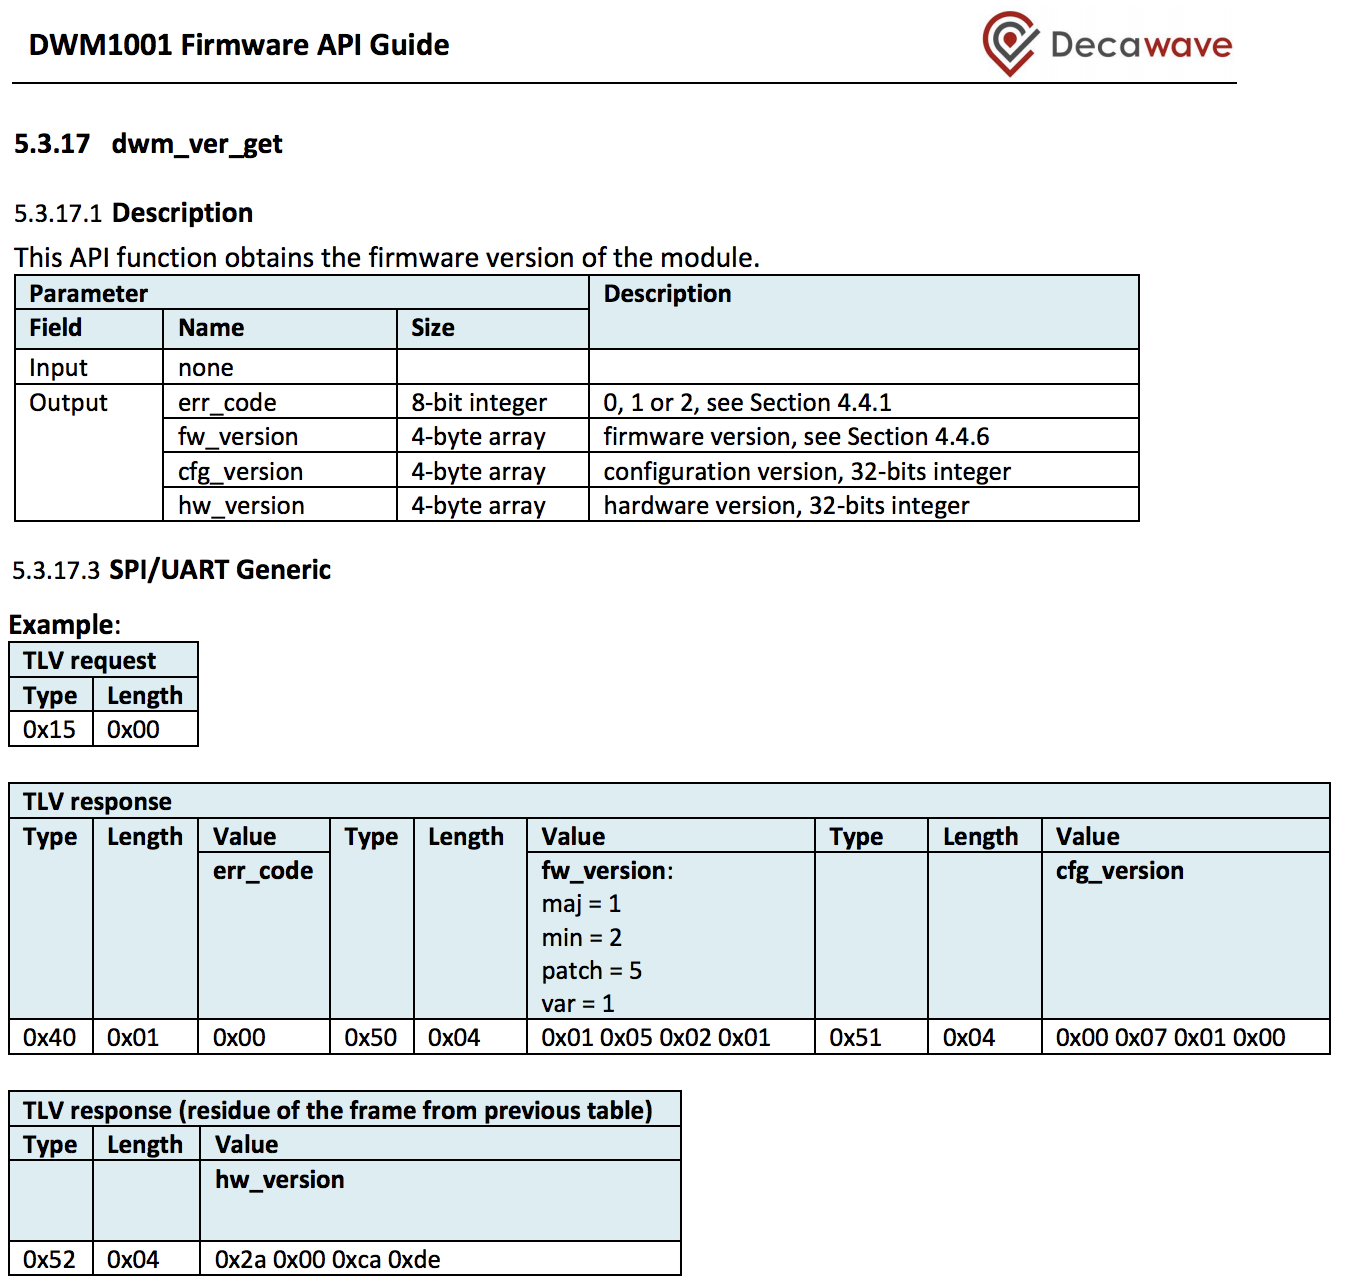
As a first API call I would implement the 5.3.17
dwm_ver_get- This API function obtains the firmware version of the module. (about p. 61)Logically, it looks simple:
- you write two (2) bytes
0x15 0x00as (TLV) request - you read fifteen (15) bytes
0x40 0x01 0x00 0x50 ...as (TLV) response - you interpret the read bytes by splitting them up and creating a response object. You have to plan for an OK-object - a version object - when error comes back with 0x00, an NOT_OK-object - an error object - when error comes back with something else than 0x00. (Pseudo code below uses for latter also the version object - with integrated error info.)
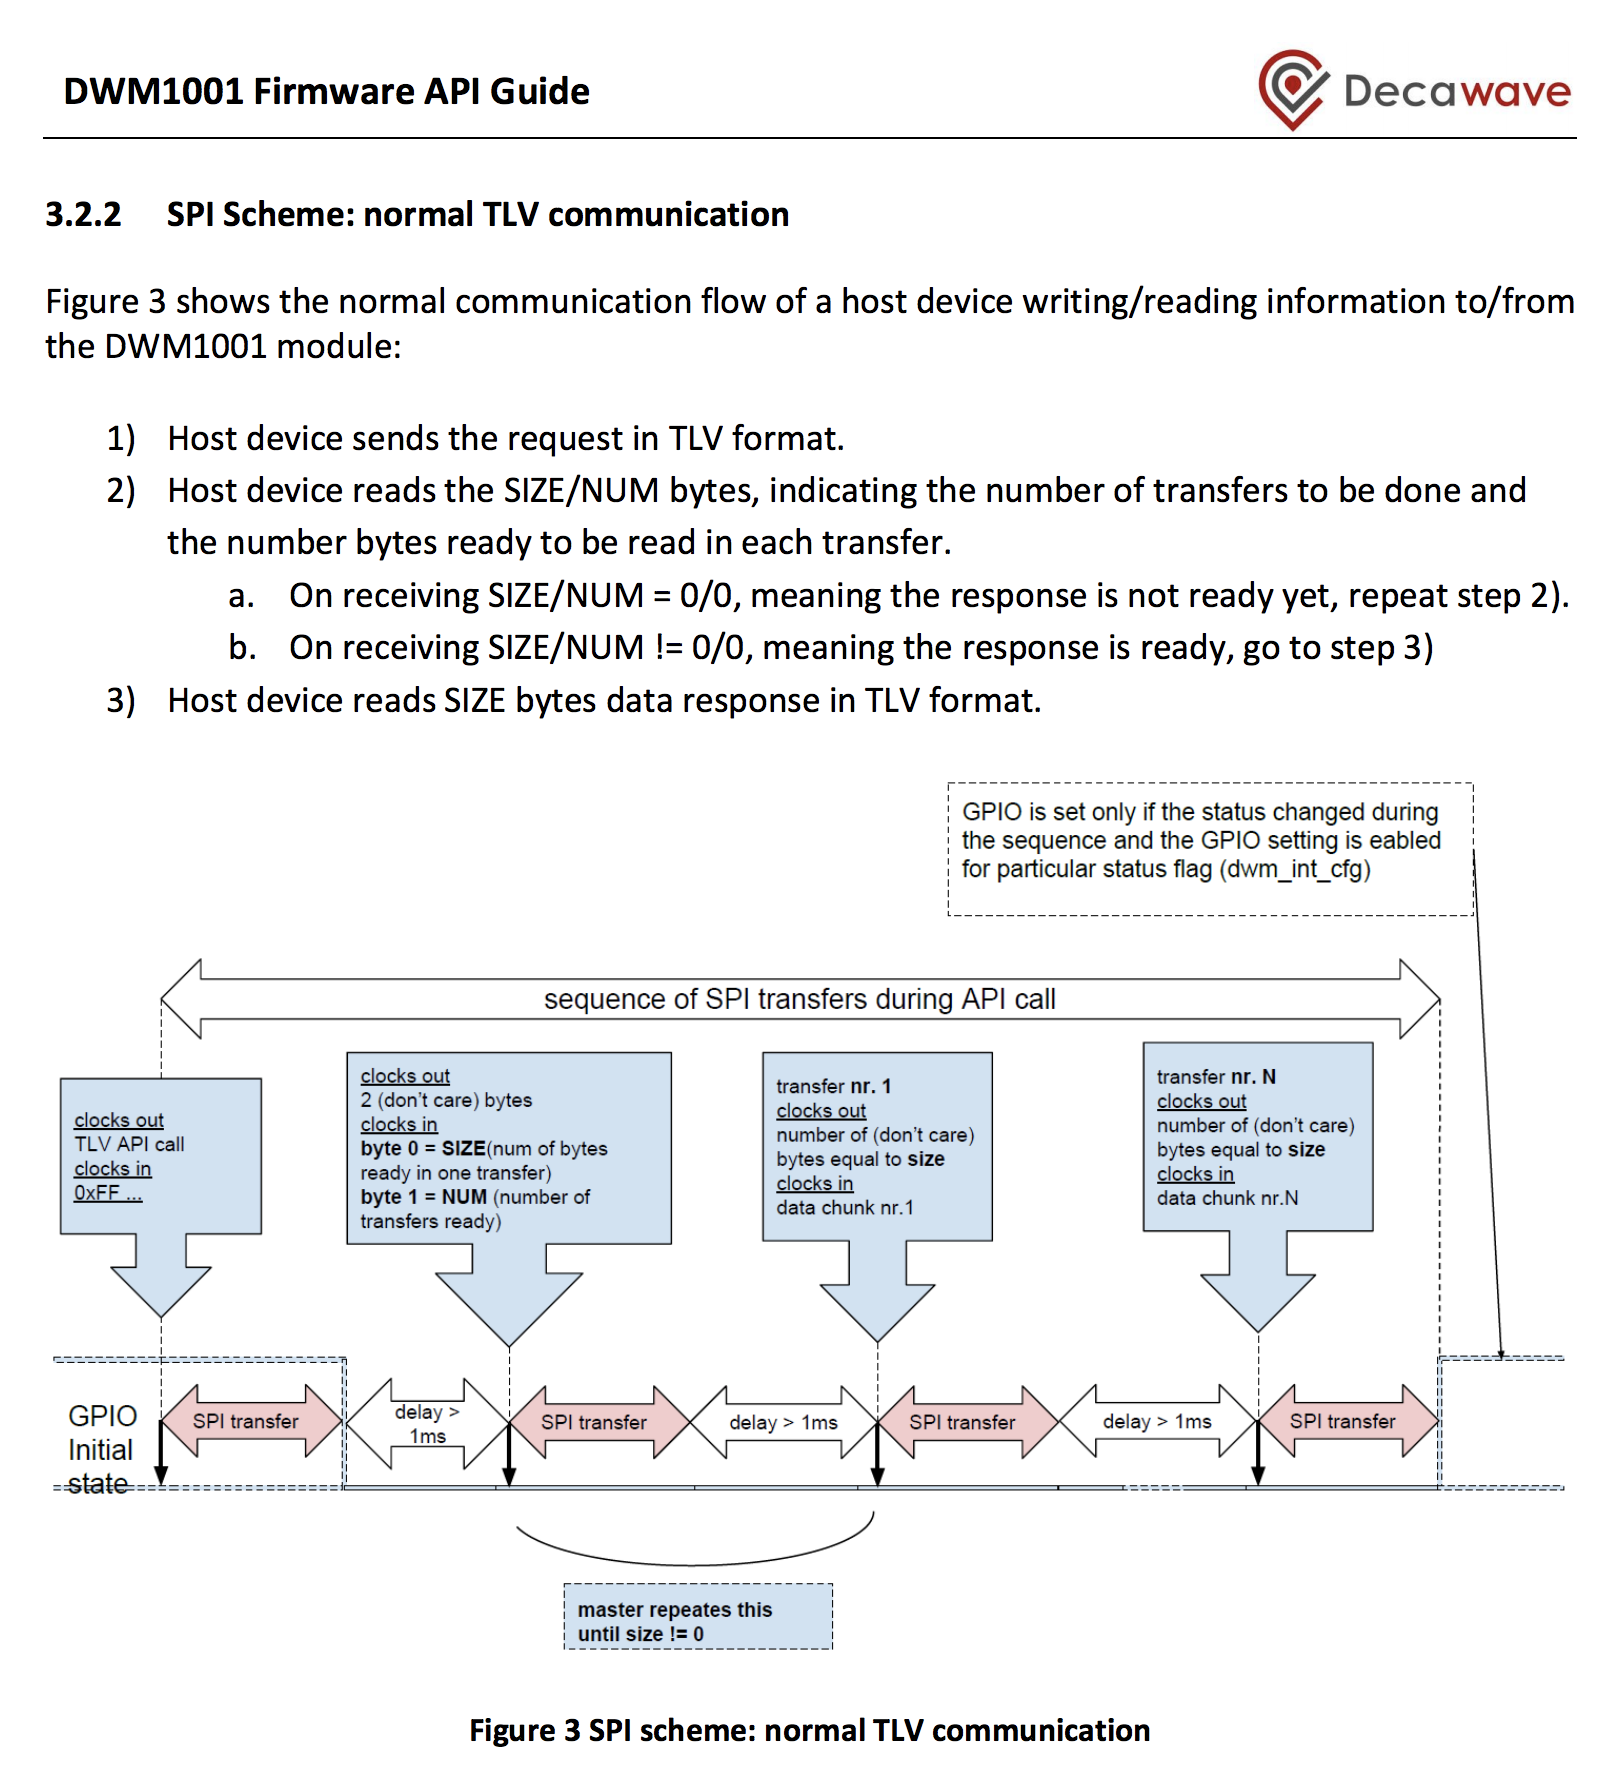
Physically, a bit more goes on then just straight reading the response (all reads and writes via SPI) - see 3.2.2 SPI Scheme: normal TLV communication and 3.2.3 SPI Example: normal TLV communication / Figure 4 SPI example: normal TLV communication (about pages 18 + 19).
- you write two (2) bytes
0x15 0x00as request - you read - deferred with a timeout of, for example, 10ms (>1ms) - two (2) bytes as communication control bytes about the response the device has ready for you to read:
- byte 0: a
packet_sizebyte (SIZE) - byte 1: a
packet_countbyte (NUM)
- byte 0: a
- you interpret - byte 0 - the
packet_sizebyte (SIZE):
- if it is
===0, then you go back to step 2. - if it is
>0, then you continue with step 4.
- if it is
- you
read packet_countpackages ofpacket_size byteseach - deferred as well - into and compose a single response. - you interpret the response string according the TLV description (by passing it to a class constructor and getting a nice object back)
PS: Above pseudo code is for single package responses - which all but 2 are.
For the coding try not to do the "delay"-approach that is usually done in Arduino context. Use the event driven approach with
setTimeout( function(...) {...}, 10);. In - still - pseudo code this looks about like:// some declaration and setup stuff about the SPI to communicate with function DwmVersion(response) { // define version object constructor this.error = ... // unpack the error from response[..] ...(Uint8Array) if (this.error) { // keep going // do something more about error interpretation, for example // this.errorMessage = ... } else { // ...happy path... set errorMessage to "" so you can... this.errorMessage = ""; // just check for ! errorMessage in callback // this.fwMajor = ... // firmware major version // this.fwMinor = ... // firmware minor version // ...for all what is in the response definition } } DwmVersion.prototype.toString() { return ( "DMW1001C Version: " // + (this.error) // ? "Error "+this.error+" - "+this.errorMessage // : ""+this.fwMajor+"."+this.fwMinor+... ); } function readResponseChunk(callback,responseClazz,response,size,count) { // var chunk = read(size bytes) // response.append(chunck); if (count > 1) { setTimeout(readResponseChunk,deferTime ,callback,responseClazz,response,size,count - 1); } else { var responseObject = new responseClazz(response); callback(responseObject); } } function readSizeAndCount(callback,responseClazz) { // var controlResponse = read(2 bytes) sizeCountBytes (2) ...(Uint8Array) // var size = ...something of controlResponse[..] (unsigned int) if (size === 0) { setTimeout(readSizeAndCount,deferTime ,callback,responseClazz); } else { // var count = ...something of controlResponse[..] (unsigned int) // var response = ... (Uint8Array) setTimeout(readResponseChunk,deferTime ,callback,responseClazz,response,size,count); } } function getVer(callback) { // sendRequestBytes... setTimeout(readSizeAndCount,deferTime,callback,DwmVersion); } function onInt() { // reset if implemented and needeed getVer(function(versionObject) { console.log(versionObject); }); } setTimeout(onInit,999); // while deving; remove before upload for save()There is a more efficient way to communicate using a data ready pin driving an interrupt (watched by Espruino), but we keep that for a later point in time of implementation.
Wiring all up could be worth another post... should though be obvious... (when using a Puck.js, you are safe when powering both devices from same 3..3.6V source (not a CR3025... it is too weak for driving the - 160mA - power hungry DMW1001C... Working with a Pico gets you faster round trips - since the upload goes wired in big chunks rather than 20 bytes at a time over BLE).
Should you get into trouble, you may need to implement 5.3.16
dwm_reset- This API function reboots the module (about p. 60), and fire that API call first beforedwm_ver_get.For convenience and preserve integrity of this post I attach the
version 2.2of the DWM1001 Firmware API Guide guide as current at this time (check back on regular base for updates of the API guide).
3 Attachments
- you write two (2) bytes
-
• #6
OH THIS IS EXACTLY WHAT I NEEDED, THANK YOU SO MUCH GUYS, I'm excited to try and work on supporting more boards :D
-
• #7
For the SPI communication, take a look at Espruino's SPI doc. With Puck you use all software defined SPIs. ('Finished' the pseudo code).
First develop the module inline, and then later you wrap it into a module context and provide a
.connect()method like many other device modules have - nothing wrong w/ logical copy paste ...--- is just applying patternsLooking forward to read your posts about the project's progress...
 allObjects
 Einzenheim
 Robin
Robin

Hello, I am a newer developer and pardon me if this sounds like a stupid question, but I want to get espuirno working on devices that are not espruino boards like the DWM1001C module from Decawave. I am not even sure where to start to doing that on my own and being able to contribute to it. Im a web developer and mainly just know JavaScript but don't mind getting deeper in to C when needed, like in this situation. Can anyone let me know what the process of creating support for a new Module that does not already have Espruino on it?
Answers for questions like
Do I need to wrap functionality in all the API's for modules on the board?
How to understand the github project as a JavaScript developer?
What are the steps to get espruino working on this board?
I also teach a Javascript class as my local annex and wanted to expand in to greater detail the ability to interface with different technologies with a easy to understand and learn language like Javascript.