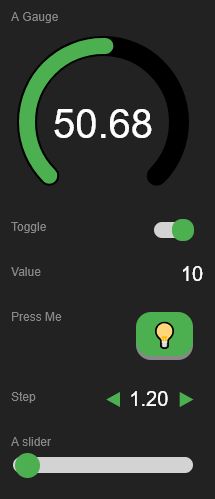
-
• #2
Wed 2018.11.07
'What would be the correct/best way to center the bar'
In true present day web deployment, the
< center >element was abandoned years ago in favor of CSS using properties.https://developer.mozilla.org/en-US/docs/Web/HTML/Element/center
You might also consider wrapping your control in a separate
divand aligning thatdivorspancontainer using attributes.Keep verifying browser compatibility as you develop your control(s). You'll be surprised at how different browser vendors interpret the specs.
Your use of webkit may reduce the headaches.'I am working my way on learning html+css+js'
Should your class start off with Html5 and CSS3 you'll miss out on all the version transition fun (not) I've had over the last twenty years!! ;-)
@Gordon, @allObjects, please remind me of the syntax that will allow aligning elements in block form when creating a string, to make development layout easier to read. Didn't it use three back ticks```perhaps? Unable to locate the recent forum post with an example in it.
EDIT: Found it
Template strings to inline elements using a single`back tickref #2 http://forum.espruino.com/conversations/327325/#comment14488693
-
• #4
Here is a new css button class.
.td_button {
  margin-top: 10px;
  margin-left: auto;
  margin-right: 10px; /* centered */
  display: inline-block;
  padding: 6px 16px;
  font-size: 24px;
  font-weight: bolder;
  cursor: pointer;
  text-align: center;
  text-decoration: none;
  outline: none;
  color: [#fff](https://forum.espruino.com/search/?q=%23fff);
  background-color: [#4CAF50](https://forum.espruino.com/search/?q=%234CAF50);
  border: none;
  border-radius: 15px;
  box-shadow: 0 4px #888;
  -webkit-transition-duration: 0.2s; /* Safari */
  transition-duration: 0.2s;
  overflow: hidden;
  cursor: pointer;
}
.td_button:active {
  background-color: [#4CAF50](https://forum.espruino.com/search/?q=%234CAF50);
  box-shadow: 0 0px #888;
  transform: translateY(4px);
}
.td_button:hover {
  background-color: [#06B](https://forum.espruino.com/search/?q=%2306B);
}
/* {label, glyph, value, toggle}*/ TD.button = function(opts) { var pressed = opts.value ? 1 : 0; opts.glyph = opts.glyph || "💡"; var el = setup("button", opts, toElement(`<div align="right" class="td td_btn" pressed="${pressed}"><span>${opts.label}</span><div class="td_button">${opts.glyph}</div></div>`)); el.getElementsByClassName("td_button")[0].onclick = function() { togglePressed(el); }; el.setValue = function(v) { el.pressed = v ? 1 : 0; el.setAttribute("pressed", el.pressed); }; return el; };
1 Attachment
-
• #5
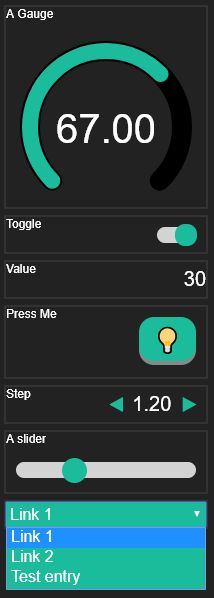
This is an attempt to create a dropdown menu.
HTML:
            d: TD.dropdown({
                x: 10, y: 505, width: 200, height: 25,
                label: "A dropdown",
                name: "dropdown",
                items: ["Link 1", "Link 2", "Test entry"],
                onchange: function(e, v) {
                  console.log(e + " " + v);
                  ws.send(JSON.stringify(e));
                }
            }),
css:
.td_dropdown {
  -webkit-appearance: none;
  background: var(--forecolor);
}
.td_dropdown select {
  background-color: var(--forecolor);
  color: [#fff](https://forum.espruino.com/search/?q=%23fff);
  font-size: 16;
  border: 0;
  border-radius: 3px;
  width: 100%;
  height: 100%;
  text-overflow: '';
  padding-right: 1.25em;
}
.td_dropdown select option {
  font-size: inherit;
  text-align: center;
}
.td_dropdown select::-ms-expand { /*Hiding the select arrow for IE10*/
    display: none;
}
js:
    TD.dropdown = function(opts) {
      function a(arr) {
        var txt = "";
        arr.forEach(function(item, indice, array) {
          txt += `<option value="${item}">${item}</option>`;
        });
        return txt;
      }
      var el = setup("dropdown", opts, toElement(`<div class="td"><span class="td_dropdown"><select name="${opts.name}">${a(opts.items)}</select></span></div>`));
      document.addEventListener('DOMContentLoaded', function() {
        document.querySelector('select[name="'+opts.name+'"]').onchange = function(x) {
          sendChanges(el, x.target.value);
        };
      }, false);
      el.setValue = function(v) {
      };
      return el;
    };
1 Attachment
-
• #6
Nice - thanks!
-
• #7
Fri 2018.11.09
Well @barbiani, quite an impressive advancement in just over a week. Be careful, as at this rate, you may be teaching the class you are about to take!!
Gordon mentioned this in your other post #2, and I called your attention to it again in #2 above. Templated Strings. And although I see you switched from the single quote
'to a back tick`it isn't clear and may not have been explained well enough as to the reason why. The simple explanation is to maintain alignment to ensure valid Html is being coded, typically to locate closing elements in a tag set.If it wasn't clear, maybe using Line 9 rewritten will bring it all in to focus:
toElement(`
 div align="right" class="td td_btn" pressed="${pressed}">
       span>${opts.label}</span>
       div class="td_button">${opts.glyph}</div>
/div>
`));
In order to allow the code block to display and show the indent, I had to remove the Html leading angle brackets
<so that the embedded code would not get rendered, (it formats and disappears) but rather just presented.Much easier to read, and to ward off possible debug scenarios.
-
• #8
...quite an impressive advancement in just over a week. Be careful, as at this rate, you may be teaching the class you are about to take!!
Actually js is not too far from C. What I find hard to digest is .NET with its amount of reserved words.
@Robin You know that I am not writing these from scratch, right? I am taking many samples and figuring out what and how each thing does what it does. The rest is finding the hundreds of variable fields available on each element. Like the < select > < option > set() function from js that is still missing in the dash.
...The simple explanation is to maintain alignment to ensure valid Html is being coded, typically to locate closing elements in a tag set.
I am not used to read html anyway... so it does not make a big difference to me. I was only following the original sources style.
-
• #9
The simple explanation is to maintain alignment to ensure valid Html is being coded, typically to locate closing elements in a tag set.
@Robin it's really not in this case. It's used here because it's more compact to insert elements with
${...}. The idea is the final TinyDash library ends up being... well... tiny - so extra characters used for indentation are far from ideal. -
• #10
I have a question about this wonderful library. Is it possible and how I can use the graph for continues data streaming (something like sliding graph). The data is streaming very quickly interval 10ms.
-
• #12
It's used here: https://github.com/espruino/EspruinoHub/blob/master/www/rssi.html#L106
So just
graphWidget.setData(data);is enough (that does a redraw all by itself)
 Robin
Robin Gordon
 barbiani

 Abhigkar
Hello everybody,
In continuation of another thread: http://forum.espruino.com/conversations/327325/#comment14492142
I am working my way on learning html+css+js while improving tinydash.
Got initially a scrollbar running and generating events.
The look is not compatible with the other widgets yet.
What would be the correct/best way to center the bar... < center > html tag or css?
add to tinydash.css:
add to tinydash.js:
1 Attachment