-
• #2
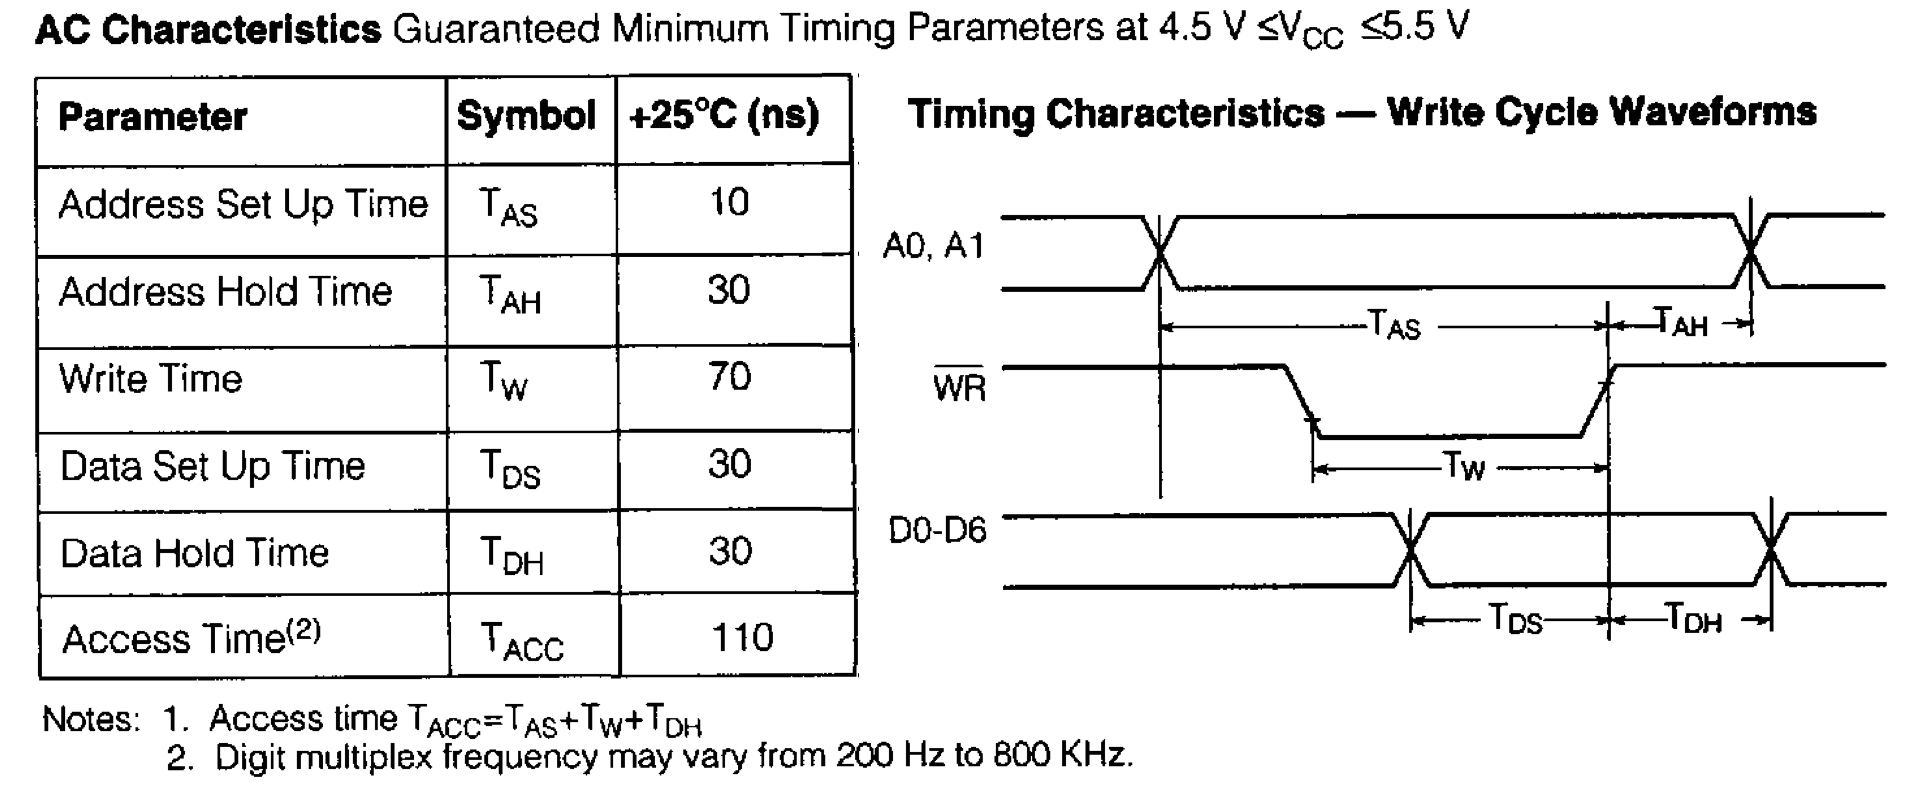
Here the code for the 4 character / single module setup and the 8 character / double module setup. Since there is no chip select, the neg-write signal line is used to write to the desired module. Siemens datasheet and clip of running text on single module attached.
// DL1414T_4.js - D SP5-14

// Espruino   DL1414T
// PICO       D SP5-14
// --------   --------
//  1 GND   - GND 7 (black)
//  3 3.3   - Vcc 6 (red)
// 13 A0    - D0  8 LSB (green)
// 14 A1    - D1  9
// 15 A2    - D2 10
// 16 A3    - D3 11
// 17 A4    - D4  2
// 18 A5    - D5  1
// 17 A6    - D6 12 MSB
// 10 B8    - A0  5 (blue)
// 11 B9    - A1  4
// 12 A10   - WR- 3

var dPs = [A6,A5,A4,A3,A2,A1,A0] // data pins
  , aPs = [B9,B8] // address pins
  , wP  = A10
  , txt = "    ESPRUINO    "
  , dgs = 4   // digits
  , pos = -1
  , iTm = 250 // ms
  , iId = null
  ;

function setup() {
  [wP].concat(dPs).concat(aPs).forEach(function(p){
      pinMode(p,"output"); });
  digitalWrite(dPs,0);
  digitalWrite(aPs,0);
  wP.set();
}

function out(c,a) { // char, address
  digitalWrite(dPs,c); // data bits
  digitalWrite(aPs,a); // addr bits
  wP.reset(); wP.set(); // write- line down and back up again
}

function dsp() {
  pos = (pos < txt.length - dgs - 1) ? pos+1 : 0;
  // console.log(pos,dgs,txt.substr(pos,dgs));
  var i = dgs;
  while (i-- > 0) out(txt.charCodeAt(pos+dgs-i-1),i);
}

function onInit() {
  setup();
  iId = setInterval(dsp,iTm);
}

setTimeout(onInit,999); // remove before upload for save()
Double module w/ 8 characters using two (2) write lines:
// DL1414T_8.js - D SP5-14

// Espruino   DL1414T
// PICO       D SP5-14
// --------   --------
//  1 GND   - GND 7 (black)
//  3 3.3   - Vcc 6 (red)
// 13 A0    - D0  8 LSB (green)
// 14 A1    - D1  9
// 15 A2    - D2 10
// 16 A3    - D3 11
// 17 A4    - D4  2
// 18 A5    - D5  1
// 17 A6    - D6 12 MSB
// 10 B8    - A0  5 (blue)
// 11 B9    - A1  4
// 12 A10   - WR- 3 (MD)
//  9 A8    - WR- 3 (LD)

var dPs = [A6,A5,A4,A3,A2,A1,A0] // data pins
  , aPs = [B9,B8]  // address pins
  , wPs = [A10,A8] // write pins
  , txt = "          ESPRUINO          "
  , dgs = 8   // digits
  , pos = -1
  , iTm = 250 // ms
  , iId = null
  ;

function setup() {
  wPs.concat(dPs).concat(aPs).forEach(function(p){
      pinMode(p,"output"); });
  digitalWrite(dPs,0);
  digitalWrite(aPs,0);
  digitalWrite(wPs,3);
}

function out(c,a) { // char, address
  digitalWrite(dPs,c); // data bits
  digitalWrite(aPs,a); // addr bits
  digitalWrite(wPs,(a<4)?2:1); // write- down
  digitalWrite(wPs,3); // write- back up
}

function dsp() {
  pos = (pos < txt.length - dgs - 1) ? pos+1 : 0;
  // console.log(pos,dgs,txt.substr(pos,dgs));
  var i = dgs;
  while (i-- > 0) out(txt.charCodeAt(pos+dgs-i-1),i);
}

function onInit() {
  setup();
  txt = "";
  for (var i=32; i<96; i++) txt+=String.fromCharCode(i);
  txt="        *"+txt+"*        ";
  iId = setInterval(dsp,iTm);
}

setTimeout(onInit,999); // remove before upload for save()
2 Attachments
-
• #3
Interesting post-'mortem': The signal sequence and timing of the initially introduced and ultimately working code is different from what the data sheet says:
Code:
- apply data bits
- apply address bits
- pull write line down low
- pull write line back up high
Datasheet (see attached diagram):
- apply data bits
- pull write line down low
- apply address bits
- pull write line back up high
If I do as the data sheet say, I get characters doubled... bleeding into the previous address... I have no definite answer for that except that I do not have exactly the Siemens module which obviously does latch the data only on the rising edge...
2 Attachments
- apply data bits
-
• #4
Wow, that's great - looks like a really neat little display :)
 allObjects
 Gordon
I just like displays... here a DL1414T / D SP5-14 .112" Red, 4-Character 16 Segment Plus Decimal Point Alphanumeric Intelligent (Bubble) Display With Memory / Decoder / Driver (and Character Generator for Space thru Underscore, ASCII 32 thru 96). There exist actually versions that have 5 more segments - totally 22 including decimal point and thousand marker, which also support lower case characters (see DL-3422 - 22 Segment Display, on youtube https://www.youtube.com/watch?v=D2cyZoCat_U
).
Checkout the shots and clips. Notice the different brightness caused not just by the camera and ambient light setup but also due to powering the display with 3.3 and 5 Volts.
5 Attachments