-
• #2
Sorry... it seems be more important : programming with the Code editor don't work now...
I re-install the drivers and the firmware... I can connect the espruino pico but I have always the error "prompt..." when I send to the espruino.
Could you help me ?
Thank you and best regards -
• #3
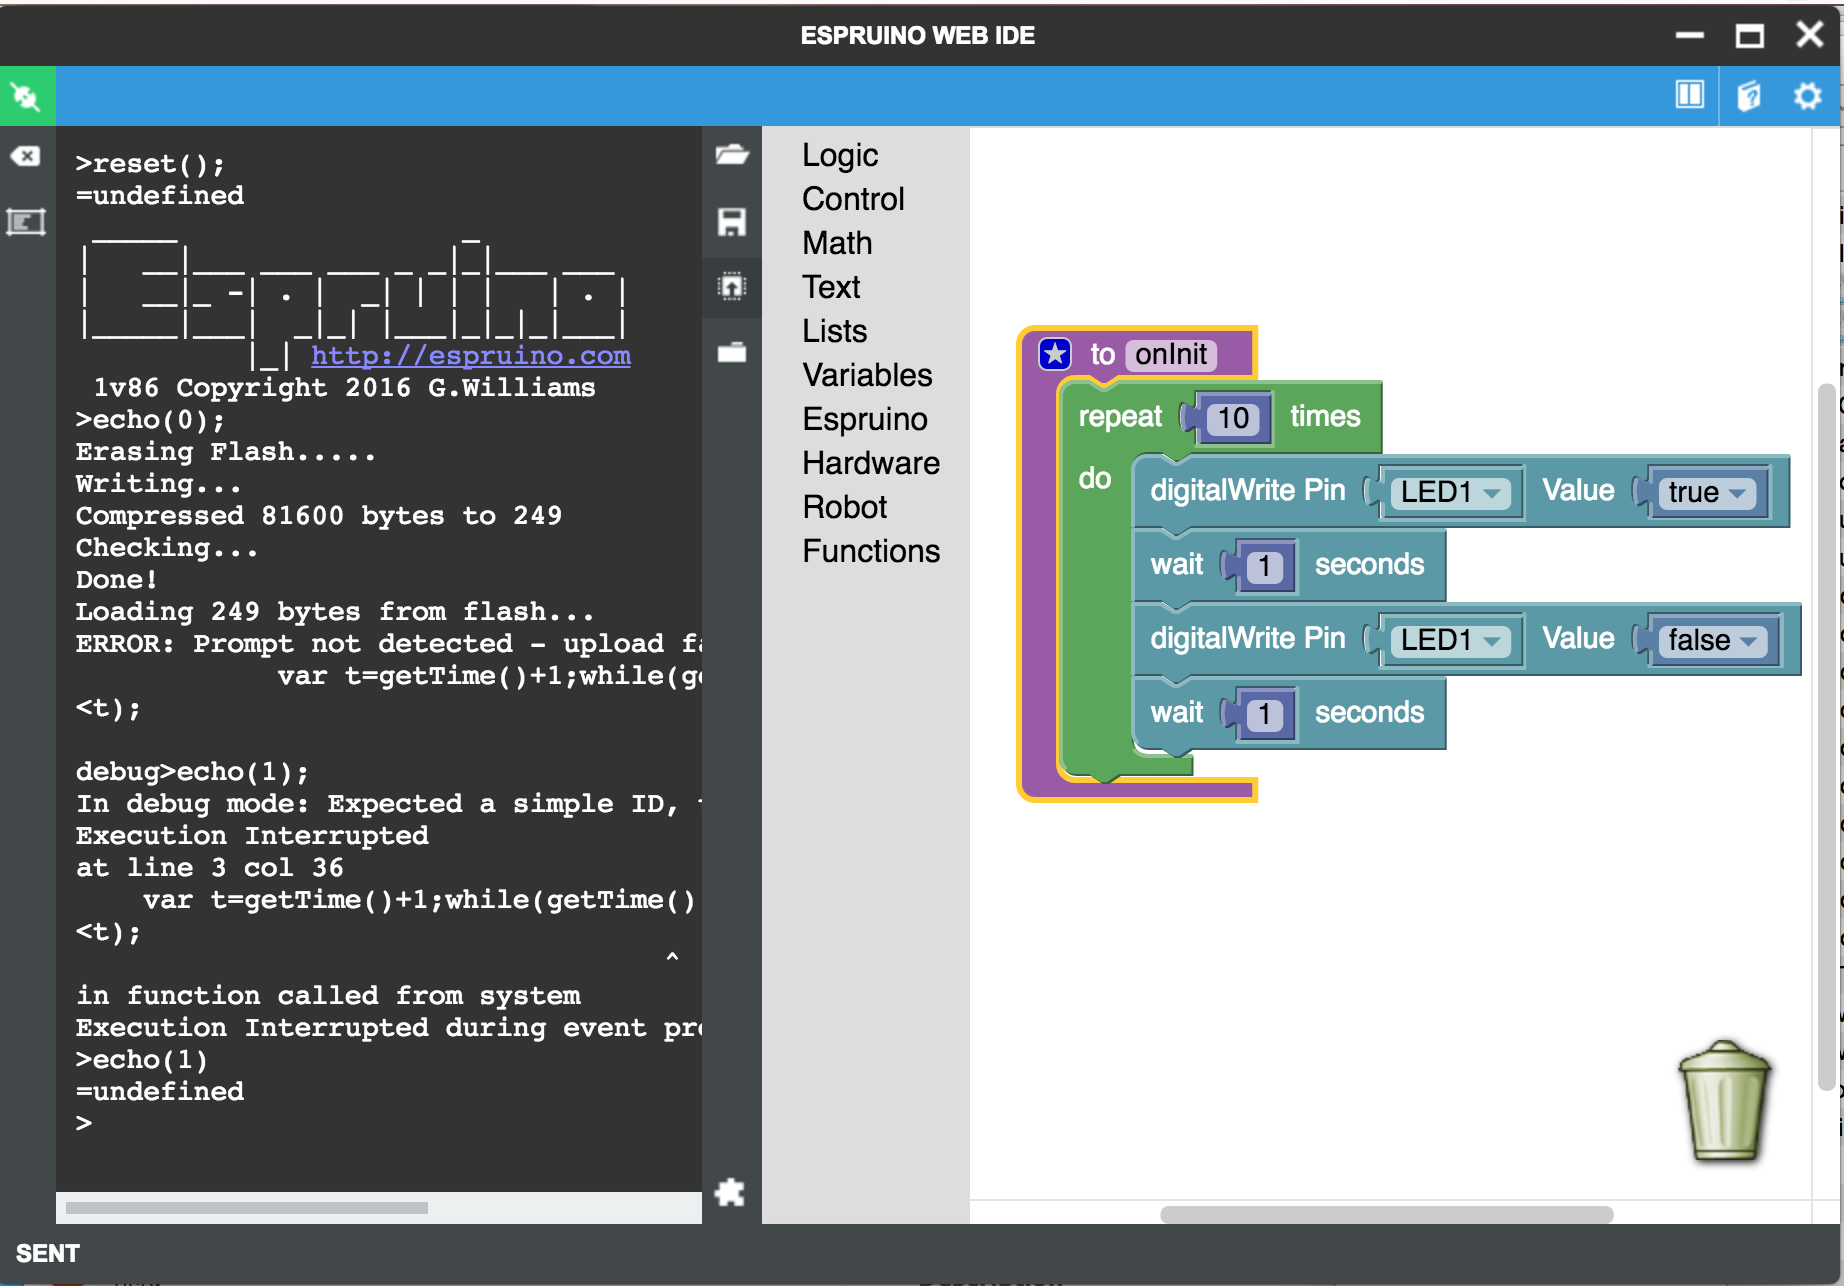
This gets you over this issue:
- Connect to Espruino (in your screenshot, Espruino shows connected)
- In settings - general, check Save on Send
- Put your code into a function called onInit (from Functions)
- Upload...
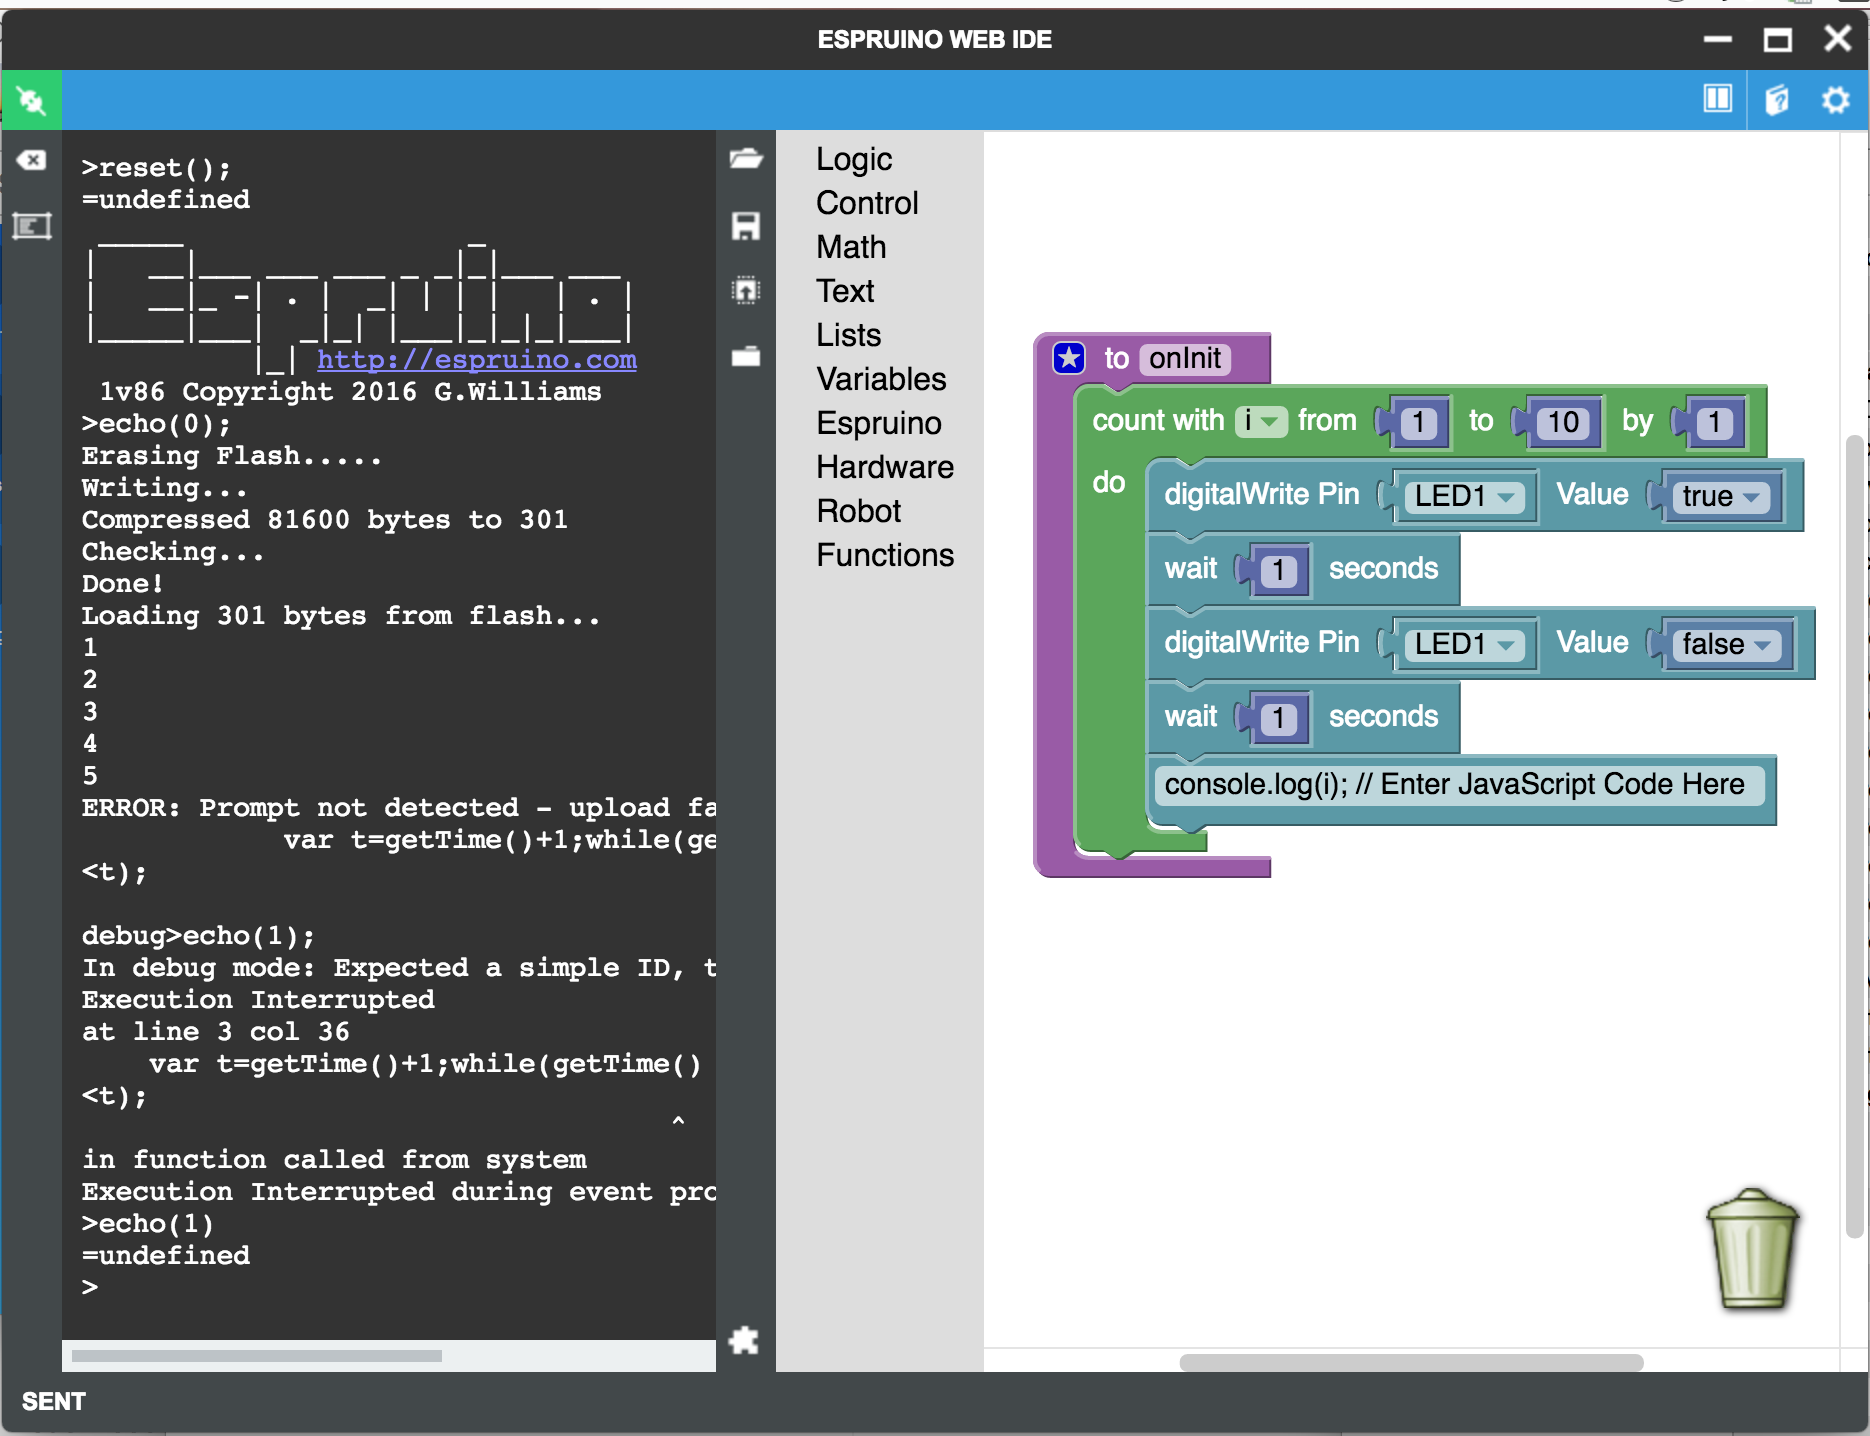
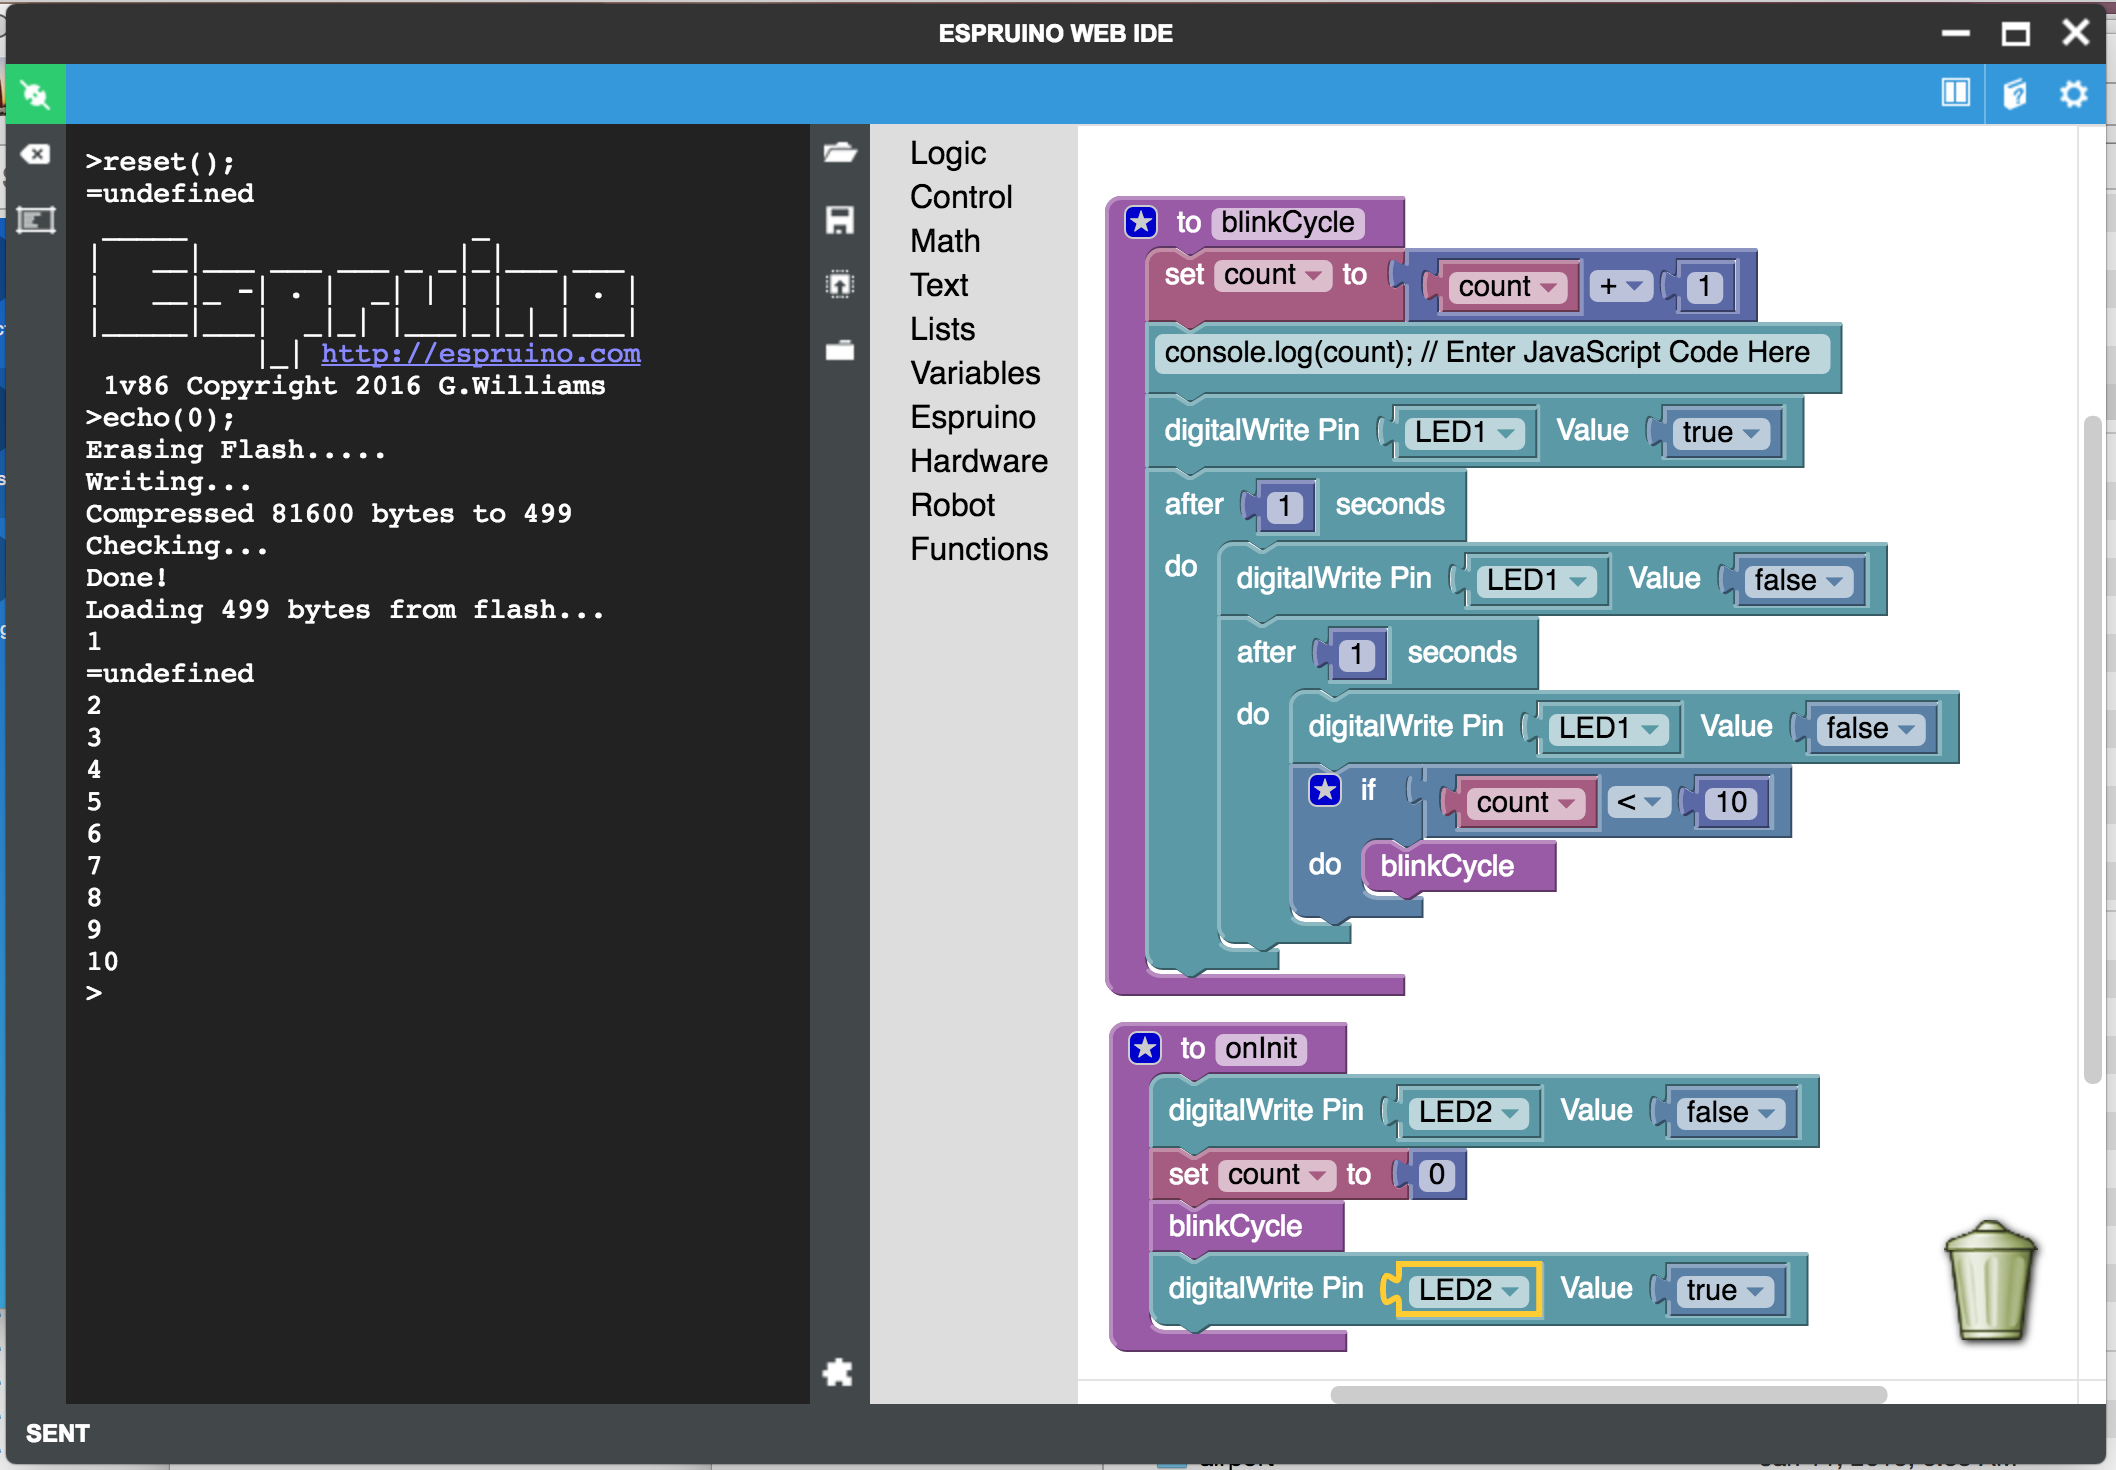
See 1st attachment. Changing the code according to second attachment, it will print for each blink the number of the blink until it 'dies'.
Unfortunately only for a few seconds... but at least for a few seconds you see the code working as expected.
Issue is because the uploaded code gets active and prevents the upload to complete properly - put the prompt out. (due to the Arduino-style implemented wait: hogging the 'process' and killing cycles until the desired time has passed... which is so un-Espruino... backwards... worse than like trying to fly a plane under water... or trying to take off a sub to fly in the air...). Conclusion AND advice: DO NOT USE THE WAIT BLOCK for time longer than a few ms!
Unfortunately this 'constant' going in javascript execution mode is never relenting to other activities, which then wait and wait an wait until the underlaying system interrupts the executing javascript.
As you may now, in settings - General you can check that when you upload to Espruino, the uploaded JavaScript code is written to the textual coding editor. It help with the analysis of potential issues...
Will think of providing a different solution to this wait... The wait should be a timeout for a timer with the next logical code block being started when the time times out. While the timer is ticking, Espruino can tend to other needs without interrupting the execution...
2 Attachments
- Connect to Espruino (in your screenshot, Espruino shows connected)
-
• #4
Just to add, there is an
every X seconds doblock - this allows you to write code that will upload fine (and that can do multiple things concurrently - your current code will be unable to respond to (eg) button presses, because it's busy doing the 'waiting'). -
• #5
For a gradual introduction, you may go the following path:
Setup to start out:
- Connect to Espruino
- Open settings (click ongear)
- In Settings - General, CHECK Overwrite JavaScript with Graphical Editor
- In Settings - Communication, UNCHECK Save on Send
- Close settings
- Switch to Graphical Editor
Let's get started with graphical programming!
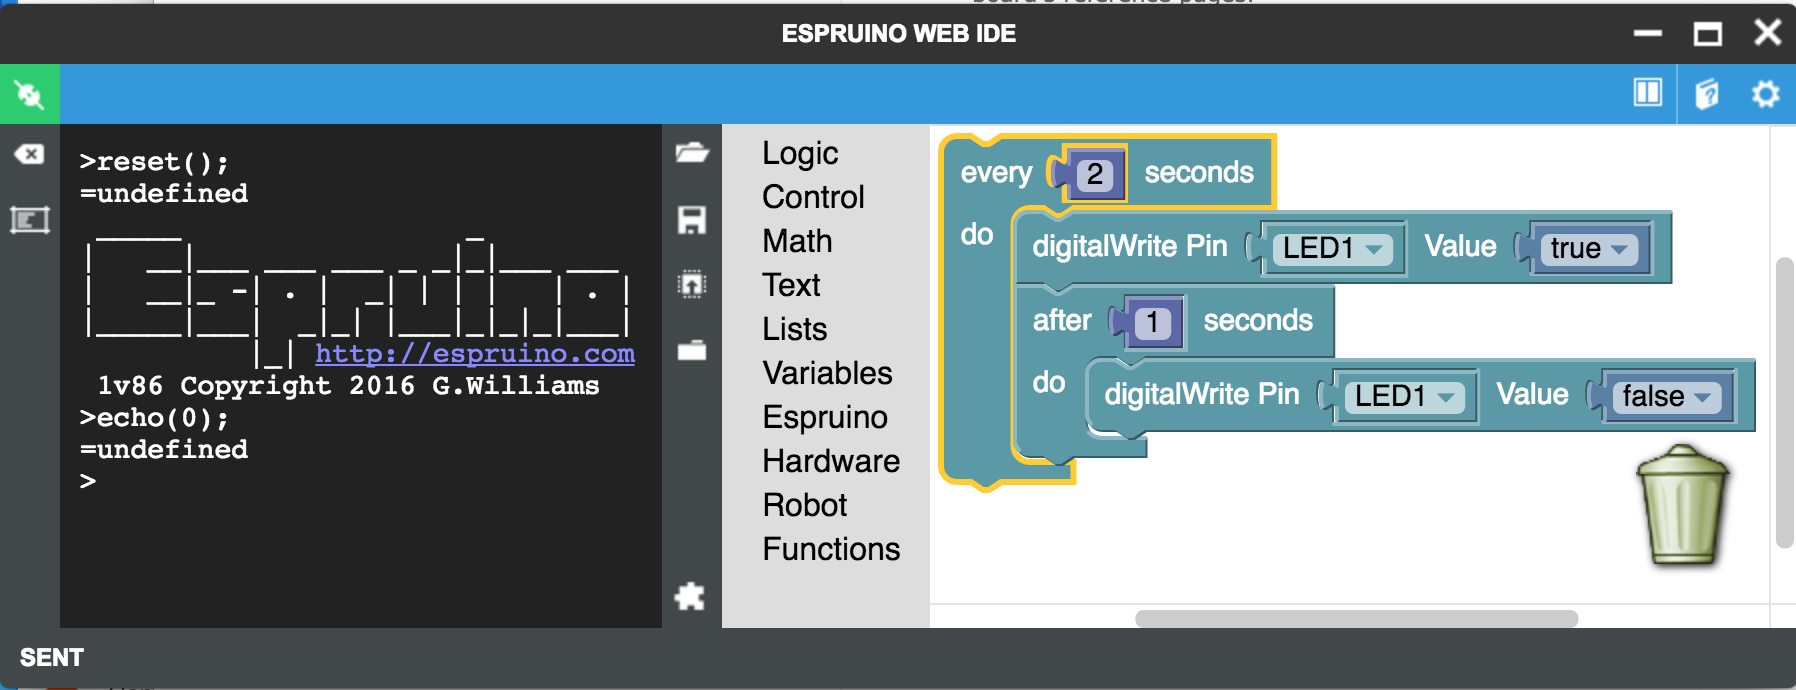
A) Create program according to attachment 1: Simple Blink using Interval and Timeout
Compose the program and upload it.
The red LED (LED1) will turn on every 2 seconds, the first time 2 seconds after upload - this uses the interval construct. After 1 second of having it turned on the red LED (LED1) will turn off - this uses the timeout construct.
Unfortunately, on power fail, or plugging Espruino out and in again, the blinking will be gone. Espruino has the ability to store the program and run independently of the development environment. As soon it is powered on, it will start the program.
Let's make the changes in the code and the way the code is handled on Espruino on upload for this 'fix'.
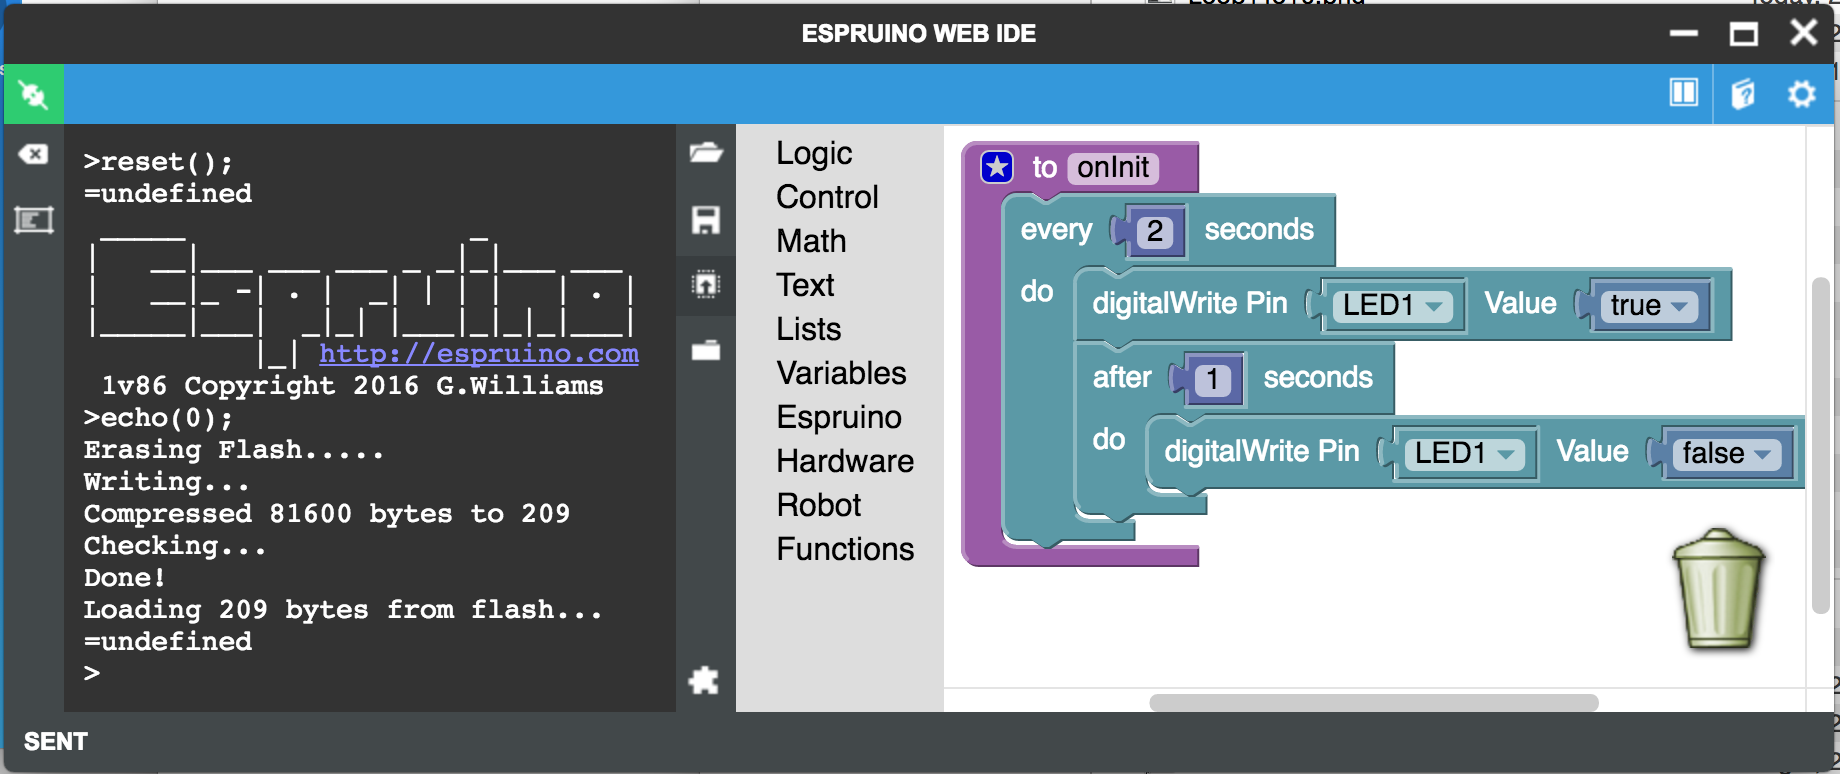
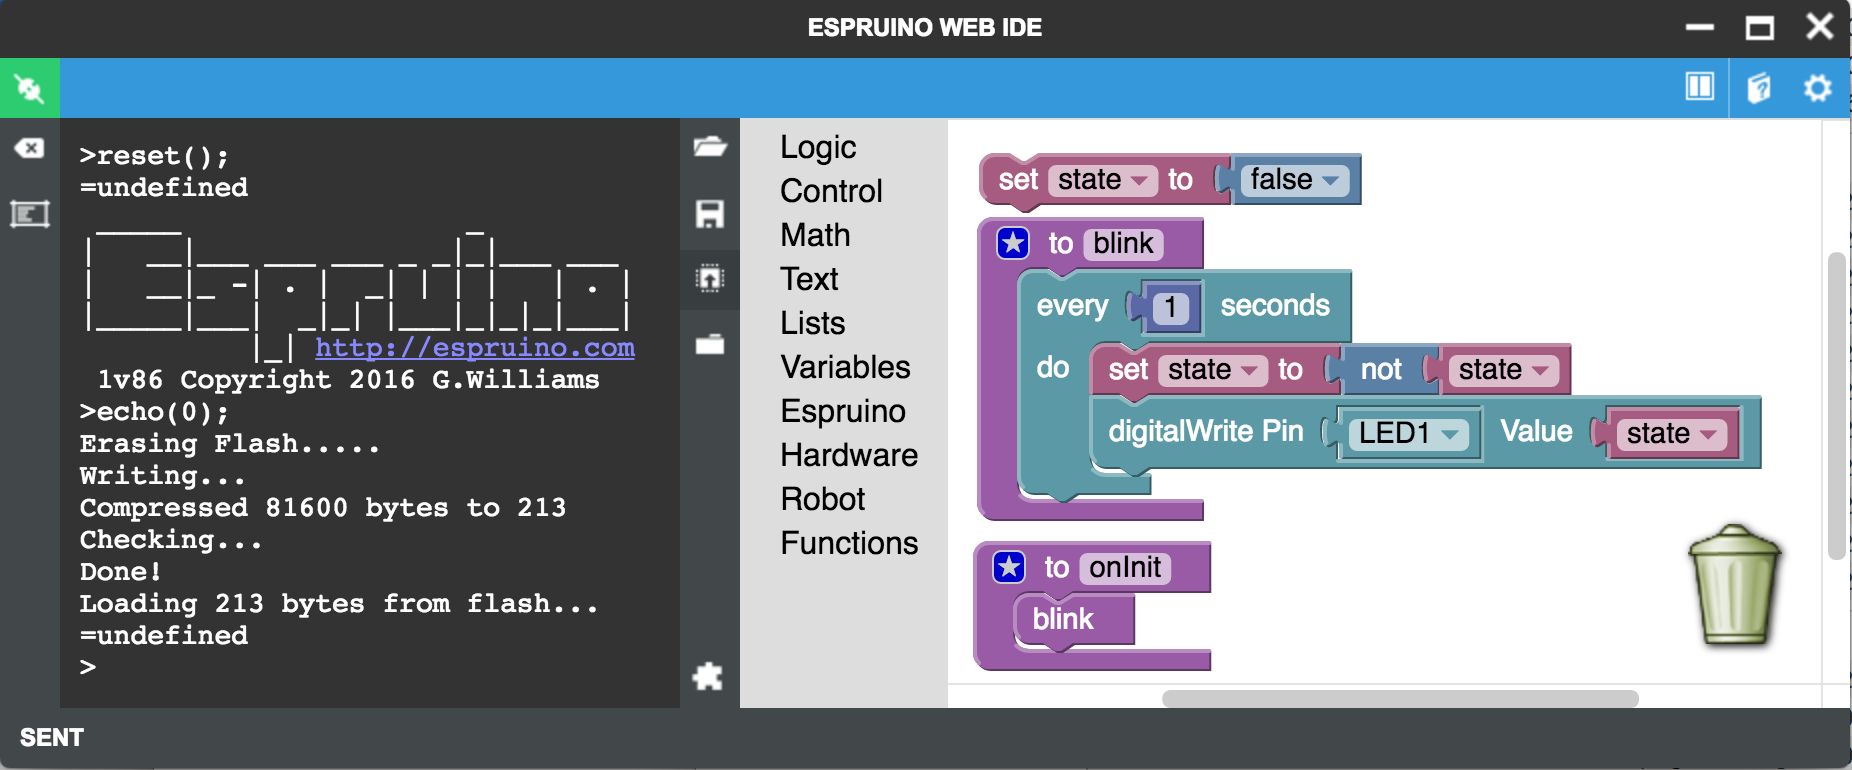
B) Enhance the program according to attachment 2: Simple Blink using Interval and Timeout in onInit
Enhance the program by pulling in from Functions the block to do something (without returning something) and name it to to onInit. Then drag-drop the existing every 2 seconds block (with all its content) into the content space of the to onInit function block.
Before you upload, go to Settings - Communication, and CHECK Save on Send. Now upload. You notice in the console the saving of 209 bytes and blinking begins.
Now you can disconnect, unplug, and re-plug-in Espruino, and blinking begins right away. The function onInit is automatically looked for and invoked by Espruino on power up.
Note: starting activities within onInit function is a so called best practice(s).
Now we go a step further and want to achieve the blinking just with interval construct and the information if the LED was on or off.
Let's make this change.
C) Modify the program according attachment 3: Simple Blink using only Timeout and State in Blink separated from onInit
Modify the program to separate the onInit from the blink and use the interval construct every 1 seconds and the state variable (in global space) that holds on to on and off state of the LED with the values true and false, respective. We can use state directly in the switching the LED pin to on and off matching true and false.
After upload, we notice that the red LED comes on already after 1 second...
It is also a very good practice to separate the onInit from the rest of the functionality / functions.
Now we can show that using interval (and timeout) construct(s), Espruino is most of the time sleeping! ...waiting for the times to elapse to flip the LED, and waiting for other business...
Therefore, lets add this feature. ...with the information provided in the next post.
3 Attachments
- Connect to Espruino
-
• #6
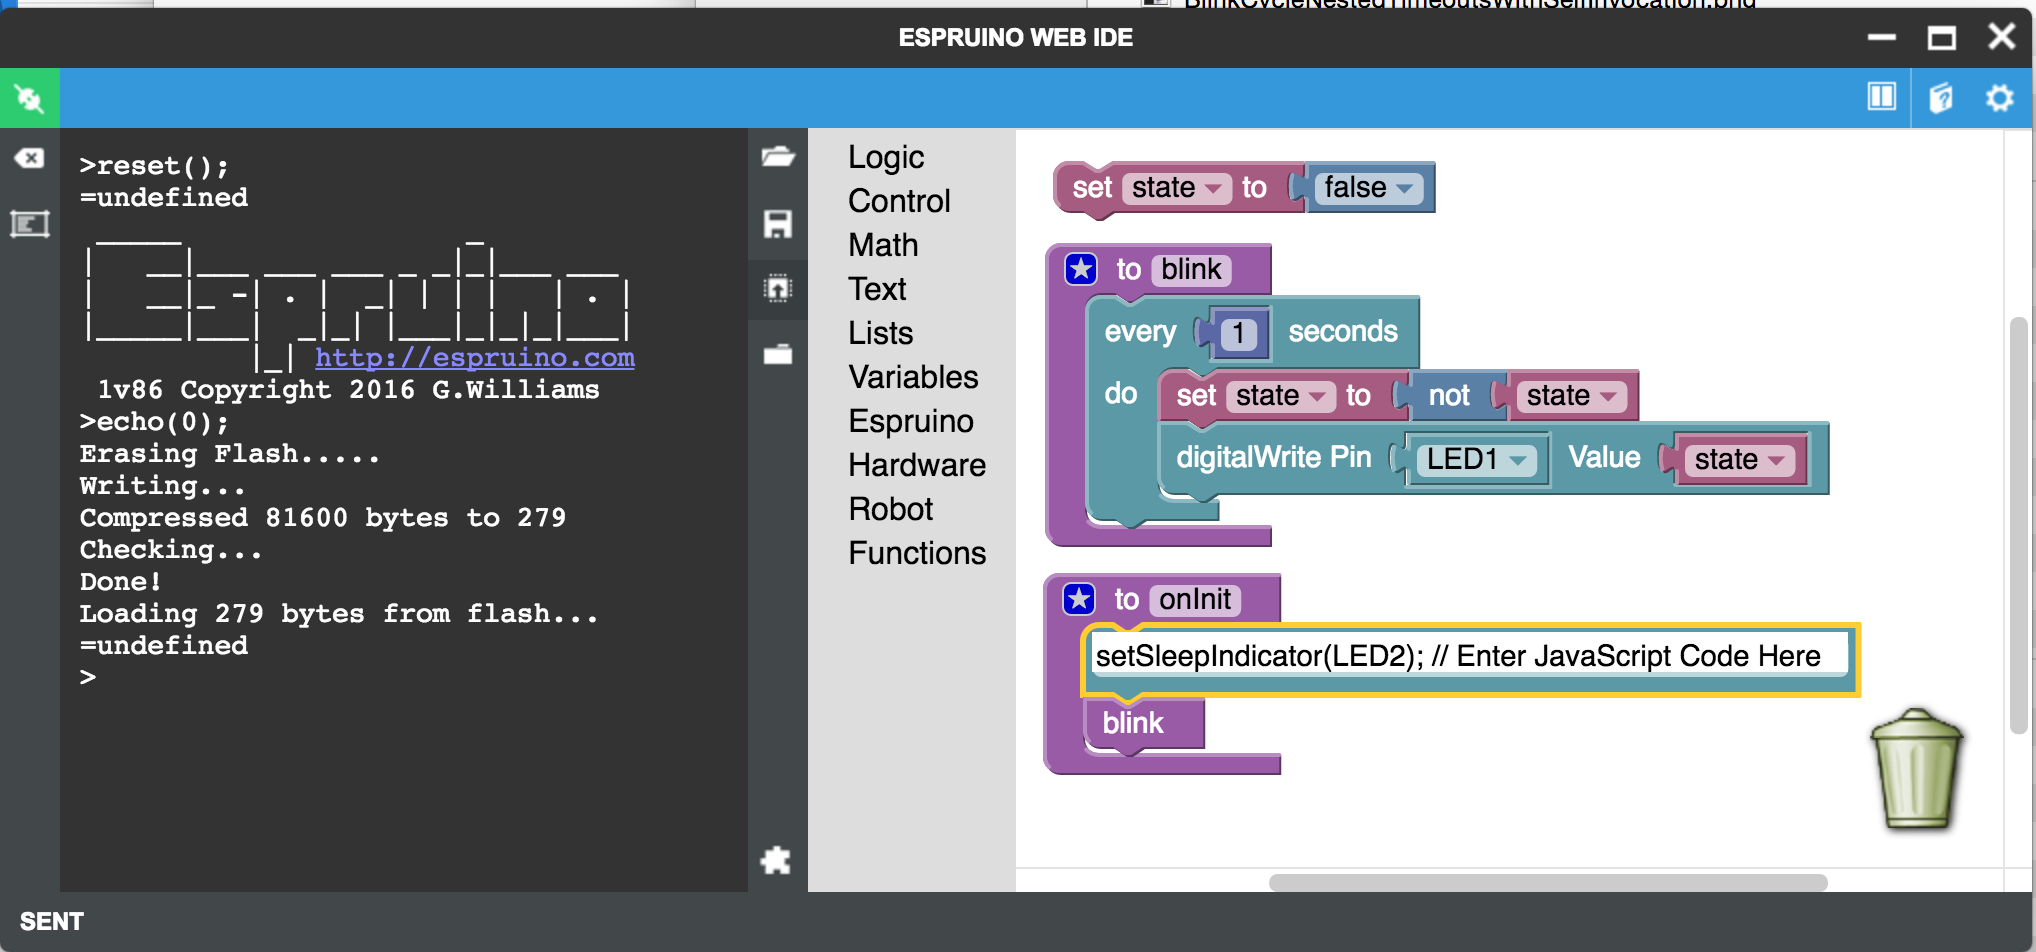
D) Extend the program according to attachment 4 (1 in this post): Simple Blink with Sleep Indicator on Green LED
For that purpose we use the very first time 'the real deal of programming': code. We have to, because there is no dedicated block available for accessing the setSleepIndicator function. But luckily, Espruino provides a general block that we can furnish with real JavaScript code.
From Espruino we grab the block reading *// Enter JavaScript Code Here*and place it into the onInit function as first thing to execute. In the blocks 'input filed' we place type this code:
setSleepIndicator(LED2);, which instructs Espruino to turn on the green LED before it goes to sleep, and turn it of when it is woken up by the interval timer to flip the LED's state and related state variable.After upload and blinking has started, we notice the the green LED is practically all the time of: Espruino is sleeping... The off is obviously so short that our eyes cannot notice.
*Therefore, let's reverse the indicator to setBusyIndicator, because our eye can notice a very, very, very short flash*.
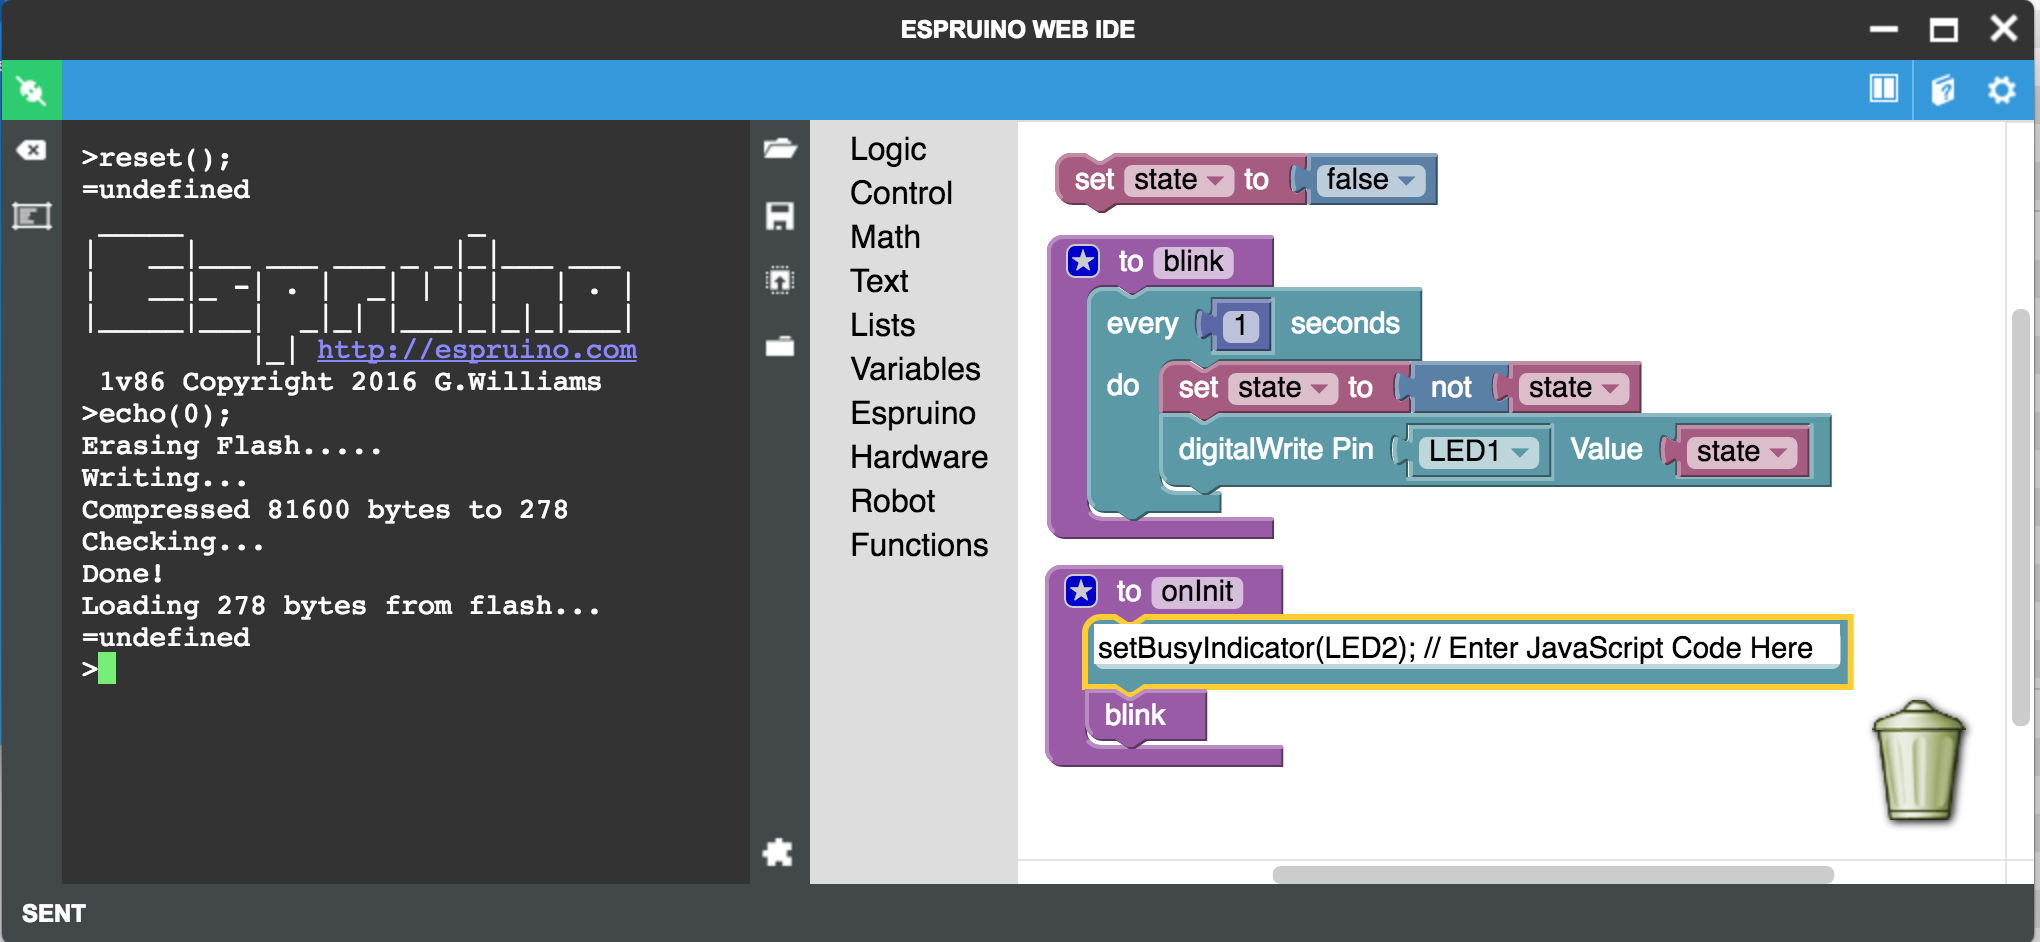
E) Modify the program according to attachment 5 (2nd in this post): Simple Blink with Busy Indicator on Green LED
Change the code in the code block to setBusyIndicator(LED2); (from setSleepIndicator(LED2);).
After upload and blinking has started, we notice the the green LED is flashing very very briefly just before the red LED come on or goes out. The green flash is easier to spot just before the red LED goes out. The red LED on going on distracts the eye from easily noticing its flashing. But it IS there.
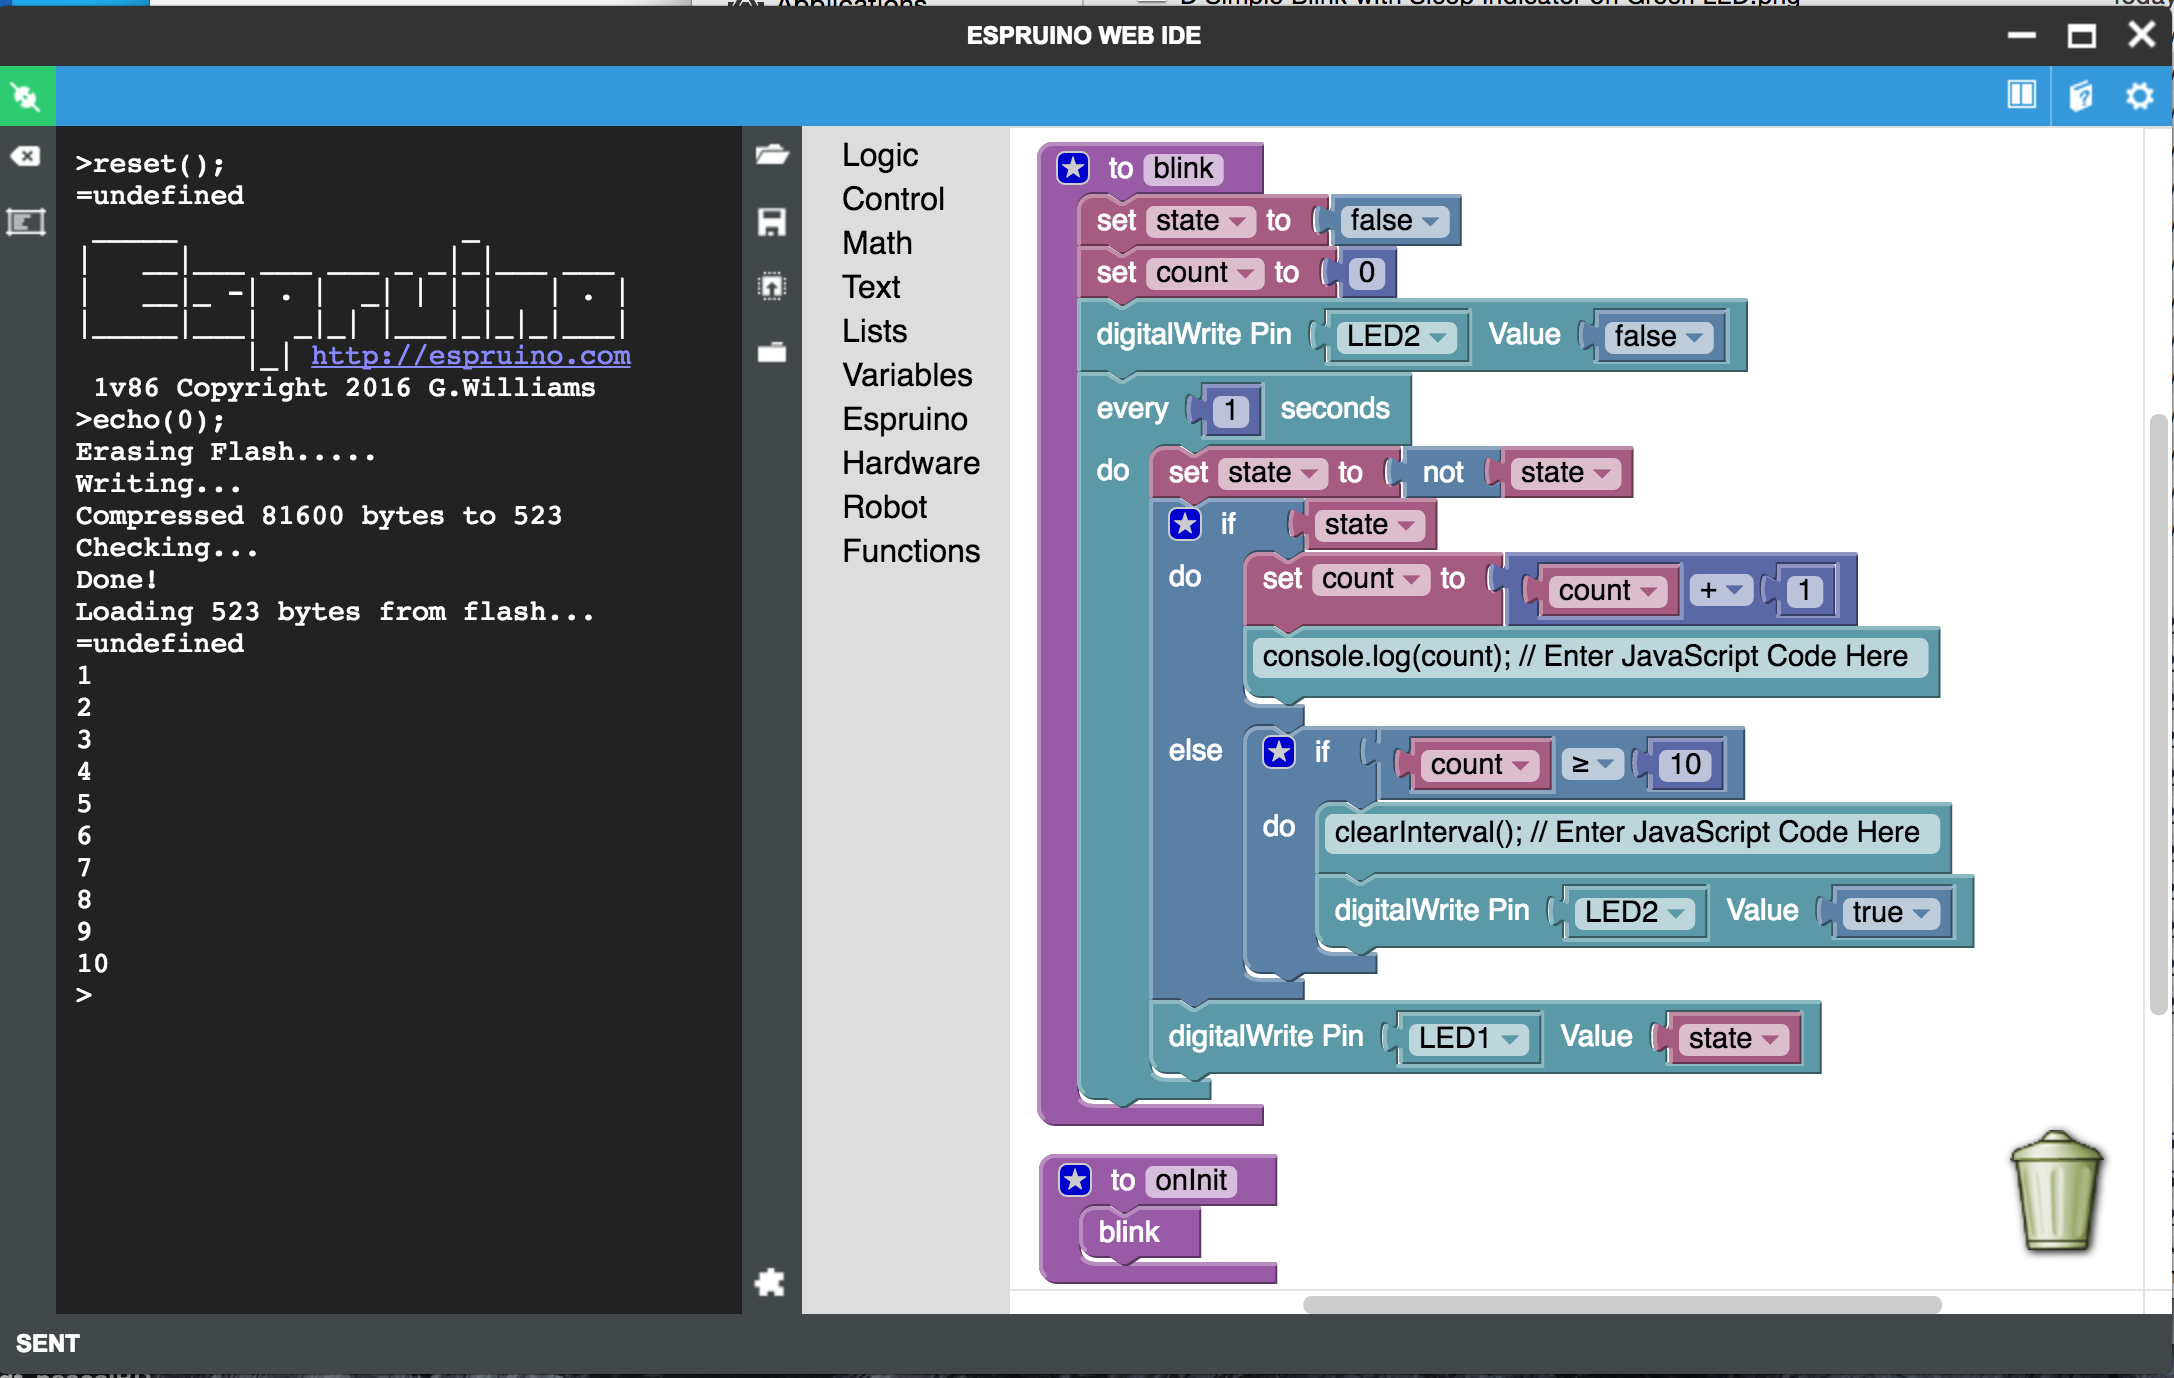
*Now, we are ready take more control of the blinking process: let's just blink it 10 times and then turn LED2 on.
F) Modify the program according to attachment 6 (3rd in this post): Blink red LED 10 times
and then set Green LED on...it does just then red LED flashes before turning green LED on.
Earlier we were surprised how little Espruino was busy.
Let's find out HOW busy Espruino really is... ...with the information provided in the next post.
3 Attachments
-
• #7
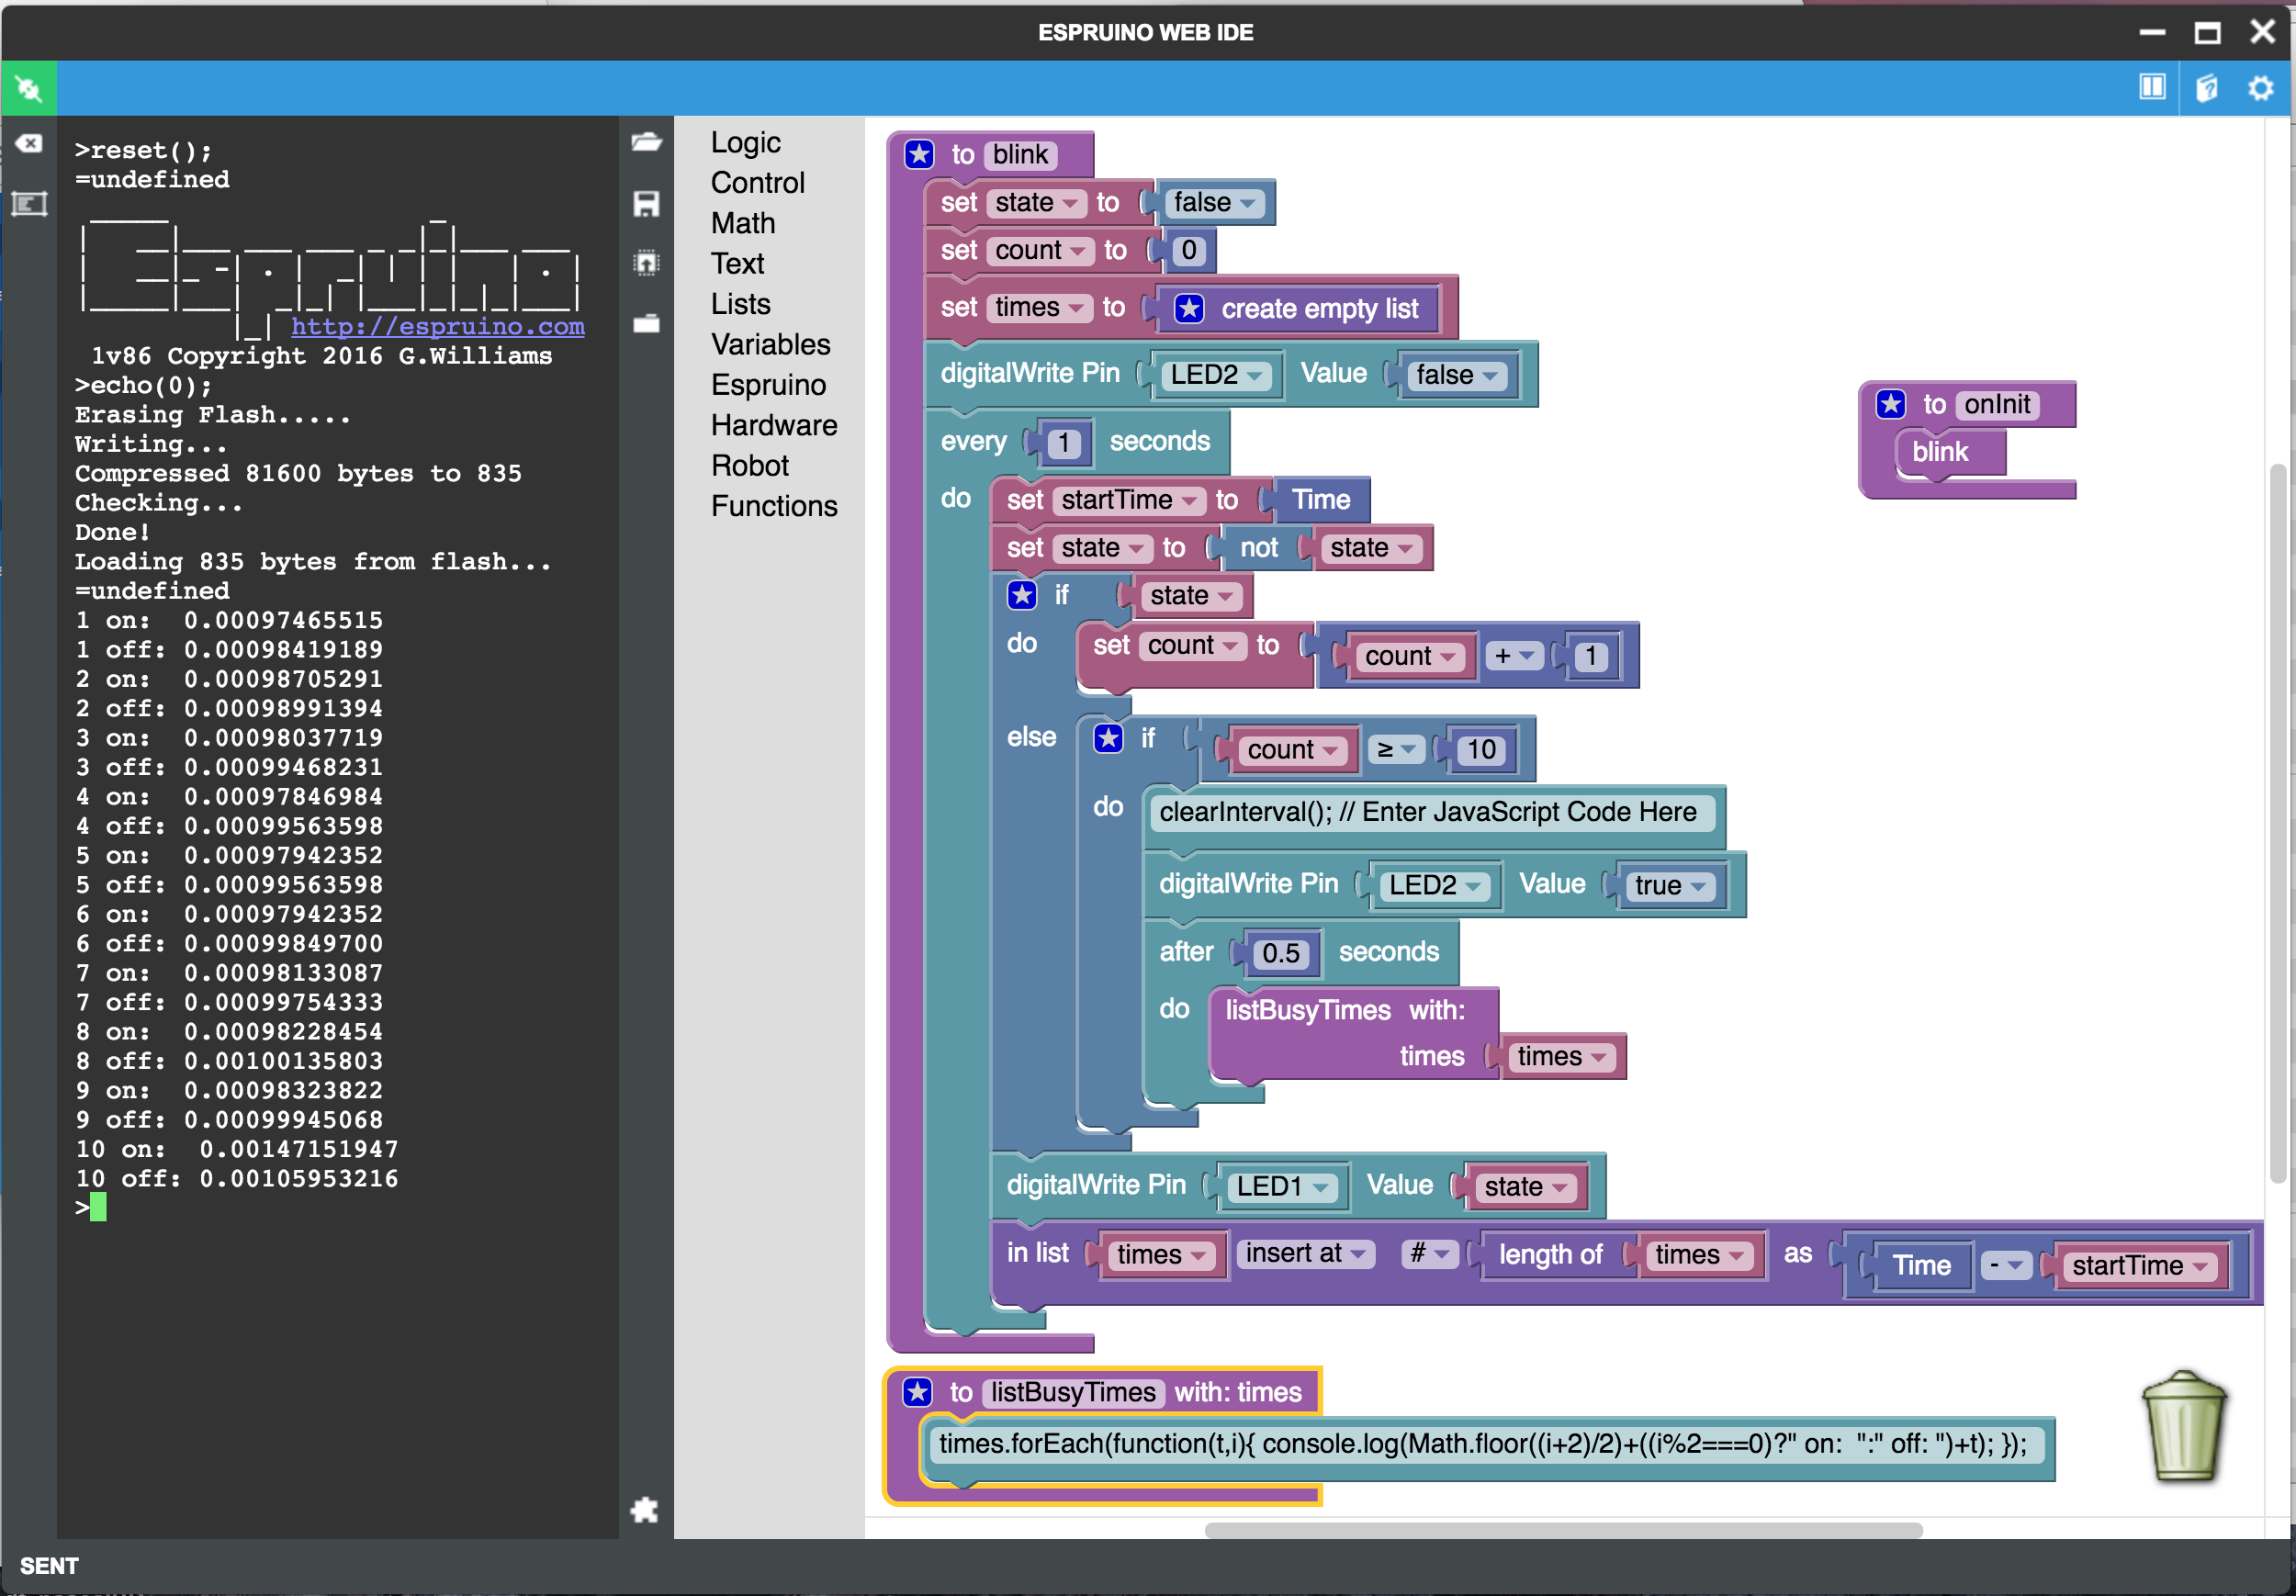
G) Enhance the program according to attachment 7 (1st in this post): How busy is Espruino with blinking
We use something new: Lists to record the busy times and list them at the end.
Printing the times gets graphically so cumbersome, that we use code to do it...
It can be done graphically, but like the insert/add at the end of the list of time taks a lot do vs. the comparable code
times.push(getTime() - startTime);, printing the list with the times would need quite some space, and for the actual printing in the log, still code to do it... Therefore, going right away for the code gets it done...And from the reported busy times we notice that Espruino spends about a (one) (1) millisecond in the blinking code: 1/1000 second. All the other 999 milliseconds it is still available to handle other events and tasks. Applying the busy times to the solution with the 2 waits of 1 second each, Espruino would show completely busy all the time until interruption...
For some icing on the cake, let's switch to the text editor, where we can see the code sent to Espruino for the last uploaded - graphic edited - program:
// Code from Graphical Editor
var times;
var state;
var count;
var startTime;

function blink() {
  state = false;
  count = 0;
  times = [];
  digitalWrite(LED2, false);
  setInterval(function() {
    startTime = getTime()
    ;
    state = !state;
    if (state) {
      count = count + 1;
    } else {
      if (count >= 10) {
        eval("clearInterval(); // Enter JavaScript Code Here");
        digitalWrite(LED2, true);
        setTimeout(function() {
          listBusyTimes(times);
         }, 0.5*1000.0);
      }
    }
    digitalWrite(LED1, state);
    times.splice(times.length - 1, 0, getTime()
     - startTime);
   }, 1*1000.0);
}

function onInit() {
  blink();
}

function listBusyTimes(times) {
  eval("times.forEach(function(t,i){ console.log(Math.floor((i+2)/2)+((i%2===0)?\" on:  \":\" off: \")+t); });");
}
We notice that the code entered in the general purpose code block is evaluated from source as string. Dropping the eval function, the begin and end double quotes, and eventual double quote escapes make it almost look like an inline code. Further noticeable is that the scoping of variables has a bit shifted... to say the least. If variable scope is consciously applied it can lead to overwritings in outer scopes.
Last but not least we are are read to take a look at working implementation based the initial idea of two consecutive waits 10 times repeated. The 'proper' setup uses timeouts for the waits and defers the execution of the remaining code following the 'wait'. The 'loop' is constructed as a deferred self invocation of the blinkCycle (not the same as a recursion).
H) Modify the program according to attachment 8 (2nd in this post): Blink with proper waits implemented as timeouts and loop as deferred self-invocation
Notice that the undesired scope shift of variables makes the code actually work: variable count is defined in function onInit(), which - when accordingly transformed to code - would be local to this function an invisible - inaccessible - by the blink-cycle function.
Scoping is any already a critical item in JavaScript, but a code generation that shifts declarations around can lead to crash and data corruption. Keeping the variable names across the whole program - globally unique, independent of the scope - prevents such contentions.
2 Attachments
 Gerald
 allObjects
 Gordon
Hi,
I try the Graphical designer (blocks) for a workshop with kids... unfortunately I cannot program the Espruino pico directely with the Graphical designer. I have always an error : "Prompt not detected..." (see printscreen above).
Could you help me ?
Thank you and best regards
Gerald
1 Attachment