-

I ran into the same problem when trying to build a board without the BLUETOOTH module. To fix it, you need to edit the file
make/family/ESP32.makeand add this line after line 10:
SOURCES += targets/esp32/jshardwareESP32.c.BTW: Removing Bluetooth also reduces power consumption by around 40ma.
-
If you have loaded the app from your iPhone, you have to make sure you disconnect. In addition, it is best to:
1) Turn off the Bluetooth on the iPhone.
2) Enable the widget on the Bangle and restart the Bangle by turning it off in settings and then on again by pressing BTN1.
3) When you reenable Bluetooth on the iPhone, you should then see the Pairing request.
I have not tested it with the cutting edge build yet.
As I point out in the documentation, reconnection is not as reliable with the standard software.
-
Thanks for the kind words.
I am not sure that having
boot0.jsin the firmware would help. I occasionally get a few cycles of the boot loop and the error seems to happen before any javascript code is executed. -
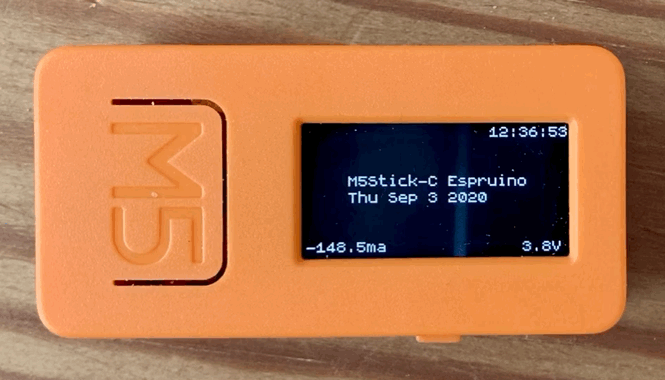
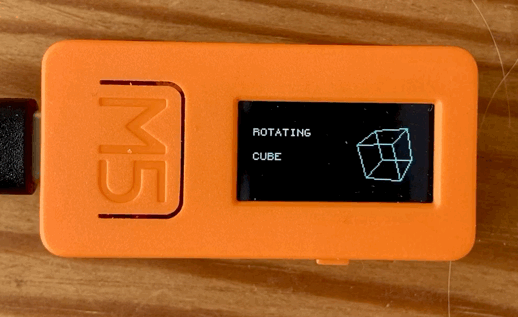
I have been using my two weeks of quarantine to implement an Espruino environment for the M5StickC device to simplify writing and running apps. The software and documentation is available in this Github repository..
Here is the boot screen:
and running an app:
A few observations on my experience with Espruino for ESP32:
On the positive side, it is a real pleasure developing and debugging using Espruino and the Web IDE versus the slog with using Arduino even with the help of PlatformIO. The Espruino API is a model of concision when compared with the labyrinthine set of modules and APIs it is necessary to navigate to program the M5StickC using Arduino.
The disadvantages of ESP32 based devices for low power applications when compared with the official Espruino platforms is very apparent. For example, the only really plausible low power mode for the ESP32 is deepSleep - wakeup from which requires a complete reboot that is very slow.
As an aside, I have augmented the ESP32 Espruino deepSleep function with a wakeup pin and will submit a pull request.
The Arduino environment does let you adjust ESP32 processor speed which can reduce power consumption dramatically, however, this is not yet implemented for Espruino (it looks a non-trivial task) and the 240Mhz standard speed is very power hungry - see display.
-
There was a bug in
flip()- now fixed. -
Thanks - not sure I got that quite right, however, you can see my version of
lcd_spi_unbuf.chere. I have not yet really tested to see if theflip()works correctly. -
Hi, I have also being doing some measurements. I am using an M5StickC which has an 80x160 pixel ST7735S screen.
WithSPISENDMANY_BUFFER_SIZE=64
Displaying a 80x160FillRect= 20ms
Displaying a 80x160drawImage= 345ms.I thought there was room for improvement for drawImage so I implemented a version of
lcd_spi_unbufwith a chunk buffer that is flushed to screen when it is full or when the address window is changed. Now the results are:With
SPISENDMANY_BUFFER_SIZE=80- the size of the chunk buffer
Displaying a 80x160FillRect= 19ms
Displaying a 80x160drawImage= 61ms.Essentially the speed up is achieved by passing bigger chunks to the
spi_send_many. The only disadvantage is that I have had to implement aflip()routine ro flush the chunk buffer after the last graphics operation. For images this more than 5 time speed up is really worth it. I suspect it would also work for the horizontal line example.If the image is rotated, the performance disappears cf vertical lines, so perhaps we should see how that can be dealt with. However, rotation within an image is not a problem.
What would be the best way of letting you all look at the code?
-
I updated my copy of
lcd_spi_unbufwith the optimisation suggested by Gordon. I did the comparison fordrawImageagain and thelcd_spi_unbufversion is now as fast if not faster than my original driver. It’s good as I can now save heap by dispensing with the chunk buffer.@fanoush - yes, I had a look before - it’s really neat.
-
Having looked at the Espruino graphics C code, I can see that there is no provision for an image bit blit style callback as there is for pixels and rectangles, so I completely agree that it’s best left as it is. I am impressed that Espruino supports reasonable performance for drawImage using only Javascript.
-
I think that’s a great idea and I will certainly have a go at it when time permits.
-
Finally got it to work - perhaps obvious in retrospect!
E.mapInPlace( new Uint8Array(img.buffer, chunks*CHUNKSIZE*img.bpp/8, remnt), g.chunkbuf, img.palette, img.bpp ); spi.write(new Int8Array(g.chunkbuf.buffer,0,remnt*2)); -
Thanks, I did try that and I think you are correct in that now that I have redone the experiment it does seem to send the right amount of data. However, it seems to scramble the pixel data in some way that I have not yet worked out:-(
Will investigate further (tbc) ........
-
Hi, I have now managed to do a comparison. See video below:
The numbers in red are the
lcd_spi_unbufdriver and the numbers in green are the version I wrote that directly implementsdrawImage. The application code for both is identical and is trying to increment and display the number every 100ms:// display incrementing number var pal2color = new Uint16Array([0x0000,0xF100]); var buf2 = Graphics.createArrayBuffer(20,64,1,{msb:true}); buf2.setRotation(3); buf2.setColor(1); buf2.setFont("Vector",20); var N = 0; function drawNumber() { buf2.drawString(N,0,0); lcd.drawImage({width:20,height:64,bpp:1,buffer:buf2.buffer, palette:pal2color},30,50); buf2.clear(); ++N; if (N>999) N = 0; } setInterval(drawNumber,100);The
drawImagebased driver (green numbers) appears to be over twice as fast as thelcd_spi_inbufversion. I have cheated a bit in that I have chosen an image size that does not create a fragment. My conclusion is that I will try to combine these two drivers to give the best of both and I think that it is still important to get a solution to the original issue I mentioned of being able to write only part of a buffer to spi.You can see the full code here
-
This caused me a little grief with your custom board tutorial:
 # Add SPI_LCD_UNBUF to handle 16bit color tft lcd displays
            'SPI_LCD_UNBUF'
Should be LCD_SPI_UNBUF!
-
That's very impressive. I have just managed to build ESP32 firmware including it using your excellent tutorial. I think spi_lcd_unbuf should be added to the standard ESP32 board as most people will want to have a display.
-
Thanks, that is really neat. I will try to compare the performance with my driver which uses drawImage. I suspect the performance of drawImage implemented on top of single pixel operations will not be great.
I still think it would be generally useful to be able to write parts of flat buffers to SPI .
-
I am developing a module for the ST7735S display on the MStick-C and have managed to get fairly reasonable performance using only Javascript. The module supports the palletted graphics
drawImageroutine to avoid having to do complete screen updates - I will post how to access this soon.To reduce the overall storage requirement, images are unpalletted and written to the device in chunks. I want to reduce the amount of buffer allocation and use only one permanently allocated buffer which holds a chunk of 16bit pixel data to write to SPI in one operation. The problem I have is that the last chunk will in general be a fragment and so I would like to only write a part of the chunk buffer. I tried using ArrayView as follows:
 if (remnt>0){
     //remnt is the fragment size
     var b =new Uint16Array(g.chunkbuf.buffer,0,remnt);
     E.mapInPlace(new Uint8Array(img.buffer, chunks*CHUNKSIZE*img.bpp/8, remnt), b, img.palette, img.bpp);
     spi.write(b.buffer);
}
This does not work as b.buffer is in fact
g.chunkbuf.bufferand consequently, the spi.write sends the whole chunk buffer rather than part of it. I have had to resort to allocating a new buffer for fragments as invar b =new Uint16Array(remnt). This allocates a new buffer each time which I am concerned may lead to problems with storage allocation due to fragmentation. Have I missed something obvious as to how to solve this? Ideally, I would likespi.write()to have a size parameter. -
Hi, iOS let’s you control which apps generate notifications in its Settings app. If you want notifications to appear in your phone but do not want the watch to see them, there is a Bangle settings option for the ANCS widget which lets you select the class of notifications you want to receive.
-
This initialisation code seems to work - it turns the backlight on, charges the battery etc. Needs to be put into a module when time permits. You can get the battery voltage and current using
batVandbatA:I2C1.setup({scl:22,sda:21,bitrate:400000}); function init(){ function Write1Byte(a,d) { I2C1.writeTo(0x34,a,d);} // Set LDO2 & LDO3(TFT_LED & TFT) 3.0V Write1Byte(0x28, 0xcc); // Set ADC to All Enable Write1Byte(0x82, 0xff); // Bat charge voltage to 4.2, Current 100MA Write1Byte(0x33, 0xc0); // Enable Bat,ACIN,VBUS,APS adc Write1Byte(0x82, 0xff); // Enable Ext, LDO3, DCDC1 // Close DCDC2 output // with out LD02 LCD light it is 0x49 Write1Byte(0x12, 0x4D); // 128ms power on, 4s power off Write1Byte(0x36, 0x0C); // Set RTC voltage to 3.3V Write1Byte(0x91, 0xF0); // Set GPIO0 to LDO Write1Byte(0x90, 0x02); // Disable vbus hold limit Write1Byte(0x30, 0x80); // Set temperature protection Write1Byte(0x39, 0xfc); // Enable RTC BAT charge Write1Byte(0x35, 0xa2); // Enable bat detection Write1Byte(0x32, 0x46); } init(); function batV() { I2C1.writeTo(0x34,0x78); var d = I2C1.readFrom(0x34,2); var v = d[0]*16+d[1]; const ADCLSB = 1.1 / 1000.0; return v * ADCLSB; } function batA() { function read13(a){ I2C1.writeTo(0x34,a); var d = I2C1.readFrom(0x34,2); return d[0]*32+d[1]; } // current in - current out (ma); return ( read13(0x7A)-read13(0x7C))/2; } -
If you have had no problems with the Atom, it certainly looks like the AXP192 needs to be initialised. Among other things, it powers the RTC which can reset the ESP32. I plan to test some initialisation code based on the Arduino class - as @MaBe suggests - when I get a chance.
-
I am beginning to suspect that it may be something to do with not initialising the AXP192 power management unit properly in the M5StickC that is causing the reset loop. The Atom does not have one.
-
Will do. Did you build it yourself or get it from the latest build archive?
-
Initially, mine worked for up to 5 minutes and then if I left it connected in went into a continuous reboot. Does yours stay up for a long time?
-
Thanks, its currently set to 'y' so I assume you mean to set this to blank. Will try and report back. The M5StickC works well with Arduino, so I will see if I can find the sdkconfig file that they use for the pico and compare it.
Espruino
Espruino is a JavaScript interpreter for low-power Microcontrollers. This site is both a support community for Espruino and a place to share what you are working on.
I have been creating an Espruino environment for the T-watch. You can see the results in the video below:
https://youtu.be/j1dHLK7ZZ_4
Apps
Bangle Apps can be ported fairly easily. The reprogramming required is to adapt the Bangle button controls to the touch screen. You can see my Multiclock app and @fredericrous 's excellent calculator in the video.
Battery life
This was the biggest headache. I implemented access to the ESP32's light sleep, however, initially, the current consumption during sleep was 20ma. I nearly gave up at that point but eventually discovered that the ESP32 Espruino port initialises all GPIO pins with pullups. When I removed this initialisation, the sleep current dropped to 4ma. The T-watch has an AXP202 power management chip and by reducing the CPU supply voltage to 2.7V, the sleep current is now 2.5ma. The battery is nominally 380mah and probably more realistically around 300mah giving around 5 days standby power - not amazing compared to the Bangle but at least useable.
The active power consumption is around 90ma - again not great when compared to the Bangle, however the screen is brighter even at 30% of maximum brightness. To get to 90ma, I have removed the BLUETOOTH component which consumes around 40ma.
Graphics
The T-watch has a 240*240 1.54ins screen driven by an ST7789V driver - the same chip as the Bangle, however the interface is SPI not 8-bit parallel. Thanks to @MaBe ‘s
lcd_unbuf_spimodule with recent performance enhancements, graphics are not as fast as the Bangle but are not unusably slow. The T-Watch has SPIRAM and consequently has 20,000 vars versus 2200 on the Bangle. This means you can freely use large ArrayBuffers and drawImage to reduce screen flicker - the analogue clock in the video uses a 200 x 240 2-bit buffer.The T-watch has very few peripherals compared with the Bangle - speaker, vibration motor, infra-red receiver and accelerometer with in-built step counter (ASIC). It does however have wifi which I plan to look at next. The software is all on Github here but completely undocumented at the moment.