external button puckjs

Posted on
  • I would like to add an external button and count how many seconds this is pressed. Can someone help me?

    Alberto

  • @user140111

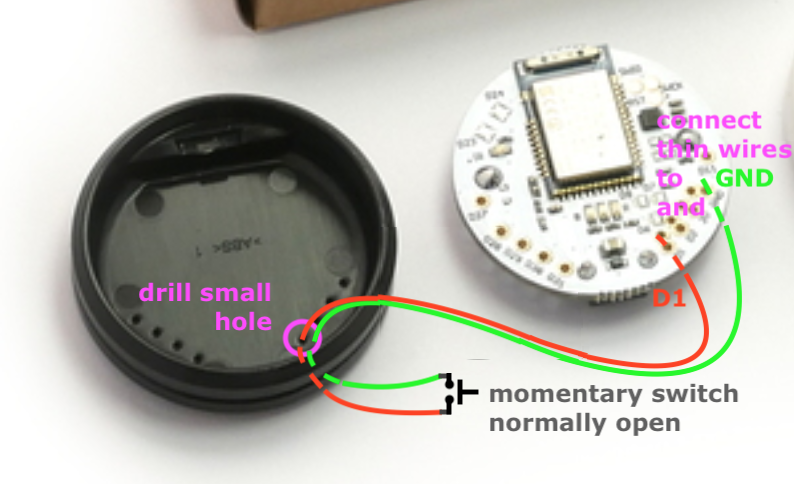
    Wire things up as shown in attached picture and use two no-repeat setWatch(...) on pin D1 initialized with pinMode(D1,"input_pullup") . Setup first watch with edge:"falling" to take the time with t0 = getTime() and setup of second watch with edge:"rising" with taking the time again ( t1 ) and re-setup first watch. Regarding the debounce time, you have to play a bit. In second watch you also calculate the difference of both times taken and show it somehow... for example by blinking as many seconds the button has been held. If it is a long time, you may use a green blinks for the tens of seconds and red blinks for the ones of seconds... ;-)


    1 Attachment

    • puckMod.png
  • For testing your wiring, upload this code. First, it sets pinMode of pin D1. After that - every 100[ms] - it writes to the LED1 the opposite what it reads from pin D1. When the switch is open, then D1 is (weak) pulled up (by internal resistor) and digital read returns 1 (or H/high or true), the opposite written to the LED1 turns it off. When switch is closed (pressed), D1 is pulled to Ground, D1 reads 0 (or L/low or false), and opposite written to LED1 turns it on. Variable iId - interval ID - is there so you can stop the program by entering clearInterval(iId) in the console.

    pinMode(D1,"input_pullup");
    var iId = setInterval(function() {
      LED1.write(!digitalRead(D1));
    }, 100);
    

    2 Attachments

  • Below is the code as described in post #2. The cycle starts over again after display has completed. Display is a series of blinking green and red blinking:

    • green for every 10 seconds
    • red for every second remaining
    • very brief red flash for less then a second

      // puckD1extPushButton.js
      pinMode(D1,"input_pullup");
      var log = function() { console.log(arguments); }
      , lon = false // log on / off
      , blT = 200 // blinkTime (on and off time)
      , flT = 20 // flashTime (for less than a second pressed)
      , t0, t1
      , wIdD, wIdU
      , down = function() {
        if (wIdU) clearWatch(wIdU);
        wIdD = null;
        t0 = getTime();
        wIdU = setWatch(up,D1
                 ,{repeat:false, edge:"rising",debounce:10});
      }
      , up = function() {
        if (wIdD) clearWatch(wIdD);
        wIdU = null;
        t1 = getTime();
        setTimeout(show,10,Math.floor(t1 - t0));
      }
      , show = function(t) {
        if (lon) log(t);
        if (t>10) {
          LED2.set();
          setTimeout(function(){
            LED2.reset();
            setTimeout(show,blT,t-10);
          },blT);
        } else if (t>0) {
          LED1.set();
          setTimeout(function(){
            LED1.reset();
            if (--t>0) {
              setTimeout(show,blT,t);
            } else{
              start();
            }
          },blT);
        } else {
          LED1.set();
          setTimeout(function(){
            LED1.reset();
            setTimeout(start,blT);
          },flT);
        }
      }
      , start = function() {
          wIdD = setWatch(down,D1
                   ,{repeat:false, edge:"falling",debounce:10});
      }
      ;
      function onInit() {
      start();
      }
      
      setTimeout(onInit,999); // comment line before upload for save()
      

    With a pretty decent - not much bouncing switch - there should be a much simpler solution... except for the display, which then gets a bit more complicated: results would have to be written to a queue and display would run asynchronously / simultaneously. To distinguish between flash/blink sequences, blue led could be flashed between the sequences.

  • And here is the 'short' version:

    // puckD1extPushButton2.js
    pinMode(D1,"input_pullup");
    var log = function() { console.log(arguments); }
      , lon = false // log on / off
      , wId
      , change = function(evt) {
          if (lon) log(evt);
          if (evt.state) {
            setTimeout(note,1,(Math.floor(evt.time - evt.lastTime)));
          }
        }
      , note = function (t) { // note (for show)
          console.log(t);
        }
      , start = function() {
            wId = setWatch(change,D1
                     ,{repeat:true, edge:"both",debounce:10});
        }
      ;
    function onInit() {
      start();
    }
    
    setTimeout(onInit,999); // comment line before upload for save()
    

    If you turn the logging on (lon = true), then you see what is goin on:

    The evt is the event object passed to the function change() called by the watch. The watch is now setup repeat:true and edge:"both" : In other words, change() is called on press AND on release of the push button. The event object passed has 3 very convenient properties:

    1. The state tells the state of the pin / what the has changed to - on press it is L/false and on release it is H/true,
    2. The lastTime tells when the watch fired the last time. If it is the first time, then it is undefined
    3. The time tells the time of the current watch firing.

    Using the event object simplifies the code a lot. Below show the log of the event object. Notice the first time - when the button was pressed for the first time - lastTime is undefined. On press event of the button we have to do nothing, but on release, we calculate the difference and pass it to the show function. In this example, the show function just logs the value in the console.

    Notice, that with this solution, we could run into time binds: new press and release events may happen faster than display can happen. Some queueing and asynchronous display of the result can help to avoid it. Calling note() with a timeout makes it also asynchronous. The function note() would then put t into a FIFO / Queue and - when it is the first entry - start the display process. The display process would then take value by value out of the FIFO / Queue and show the value until the FIFO/Queue is empty. Consuming the queue follows the same asynchronous pattern as in previous example the show function.

    [
      { "state": false, "lastTime": undefined, "time": 1644153426.08500003814 }
     ]
    [
      { "state": true, "lastTime": 1644153426.08500003814, "time": 1644153428.08899998664 }
     ]
    [
      { "state": false, "lastTime": 1644153428.08899998664, "time": 1644153429.83899998664 }
     ]
    [
      { "state": true, "lastTime": 1644153429.83899998664, "time": 1644153431.21399998664 }
     ]
    [
      { "state": false, "lastTime": 1644153431.21399998664, "time": 1644153433.33699989318 }
     ]
    ....
    

    Now, @user140111 - Alberto - it's your turn to complete the code and add the display logic with the queue and show. What makes the things so easy to understand is that there is only one thread executing JS... (speaking in os terms...).

    (PS: My dad's first name was Albert - the German version of yours...).

  • Thank you very much for your very detailed instructions. You are very kind. I'll try and let you know if everything is clear to me. You're right, my name has German origins even though I'm Italian and my ancestors have French origins.

  • Post a reply
    • Bold
    • Italics
    • Link
    • Image
    • List
    • Quote
    • code
    • Preview
About

external button puckjs

Posted by Avatar for user140111 @user140111

Actions